Buy JUNE, get a free gift with purchase:
Classic Analog Polysynth
JUNE is a faithful emulation of the Roland JUNO-60, one of the most iconic polyphonic analog synthesizers from the early 1980s.
AudioThing spent months living with the original, studying every quirk and charm, from the warm, steady DCO to the silky filter and that unmistakable chorus, then modeled its circuits in detail to bring its soul into software.
Do we really need another JUNO?
AudioThing thinks the answer is yes, if it’s done with care.
JUNE isn’t just another look-alike. AudioThing spent a long time with the real thing, studying every circuit and chasing the tiny details that make it feel alive: the way the DCO behaves, how the envelopes respond, how the filter breathes, and how the chorus shimmers and dances around the sound.
AudioThing wanted to capture that exact feeling but also make it practical for modern production.
The Roland JUNO-60 was released in 1982 as the successor to the JUNO-6, adding patch memory and a DCB interface while keeping the same core sound architecture. It offered six voices, each with a DCO and suboscillator, a resonant low pass filter, a non-resonant high pass filter, and the now iconic stereo chorus. Known for lush pads, chorused strings, and rhythmic arpeggiated patterns, the JUNO-60 was used by artists such as The Cure, Eurythmics, Enya, and Animal Collective, among many others.
Arpeggio
The JUNO-60’s arpeggiator is one of those simple features that ends up sparking whole ideas. Nils Frahm and others have relied on it for hypnotic, evolving patterns that work especially well with external effects. In JUNE, AudioThing carefully recreated that original feel and added a few thoughtful updates: new play modes, an adjustable range of up to four octaves, bar reset, and extra control over rate, velocity, and note order. It keeps the instant, hands-on vibe of the classic, while giving users more room to shape and perform their own patterns.
VCF
The filter is a big part of what makes a JUNO feel alive. A 24 dB low pass with a gentle high pass in front, built around the classic IR3109 VCF chip.
It’s smooth and warm when you open it up, but it can bite when you add resonance.
AudioThing spent time making sure it moves and breathes like the real thing: soft when you need it, bright when you push it, so it always feels musical under your fingers.
BBD Chorus
Like other Roland synthesizers of the early 1980s, the JUNO-60 includes a BBD-based stereo chorus that gives it much of its character. In JUNE, the chorus circuit has been modeled in detail, including the MN3009 BBD chips with 256 stages each, the surrounding filters, and the LFOs that drive modes I, II, and I+II. A rate multiplier allows adjustment of the internal LFO speed, with the option to switch to the slightly different JUNO-6 values. The JUNO-60 chorus also has a different texture compared to RES-09, AudioThing’s emulation of the Roland RS-09.
Effects
JUNE includes a set of four high-quality effects, inspired by classic gear and designed to complement the synth’s character. You can rearrange the effects in any order using drag and drop.
The effects section features:
- Tape Echo, based on AudioThing’s Space Echo emulation Outer Space
- Spring Reverb, adding classic vintage reverb
- Overdrive, for rich harmonic distortion inspired by classic guitar pedals
- Phaser, delivering deep, swirling modulation inspired by vintage analog phase shifters
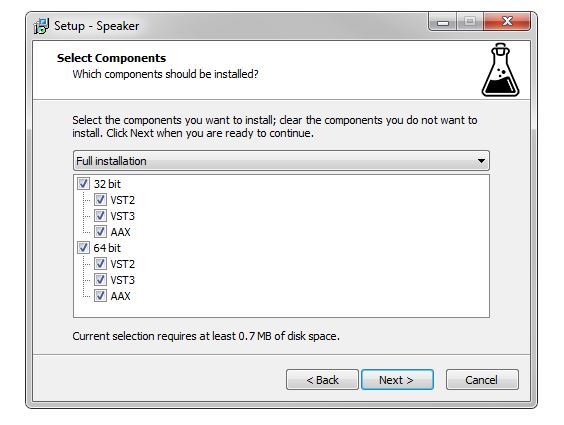
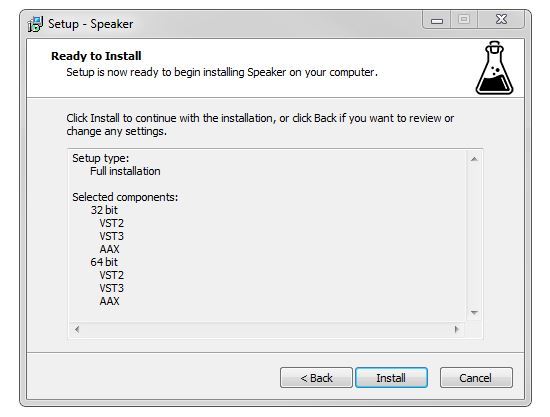
Features
- 1 DCO Oscillator (PWM, Saw, Square)
- Suboscillator (up to -3 octaves)
- HP and Resonant LP Filters
- 2 Envelopes
- 1 LFO with multiple trigger modes
- Mono/Poly and Unison Mode
- 4 Effects (echo, spring reverb, overdrive, phaser)
- Chorus I, II, I+II (J6 and J60)
- Resizable Window
- Brightness and Contrast Controls
- Preset system with randomizer
Windows
- Windows 7-11
- 2GHz CPU, 4 GB RAM
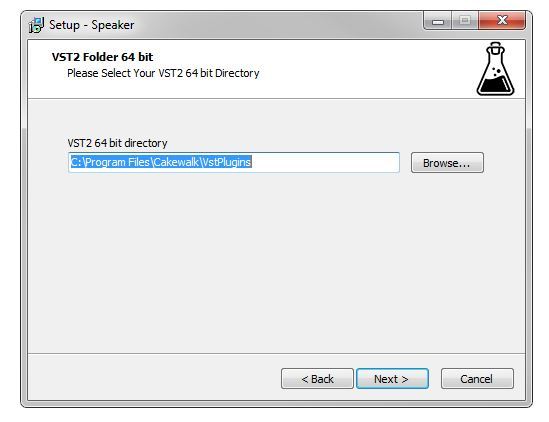
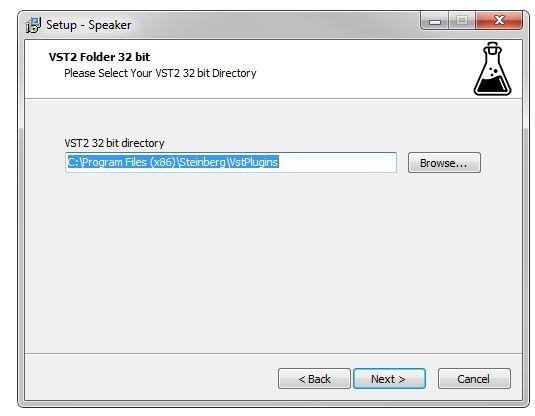
- VST2, VST3, AAX, CLAP (64-bit)
Mac
- OS X 10.13 – macOS 16
- Apple Silicon (M chips) Native (Universal 2 Binary)
- 2GHz CPU, 4 GB RAM
- VST2, VST3, AU, AAX, CLAP (64-bit)
- Universal 2 Binary
Please note: Speaker is used as the example.
Windows
1. Visit the AudioThing Login/Registration Page and enter your personal details to set up an account > then read the 'Privacy Policy' and tick the box before clicking 'Sign Up'.
Note: If you already have an existing AudioThing account, Login here and skip to step 3 of the installation process.

2. A confirmation email will now be sent to your registered email > click the link within the email to activate your account and Login here.
3. Once logged into your account, visit the Redeem Page and copy and paste the serial number from your User Account into the box provided > then click 'Redeem'.

4. Download your preferred installer as well as the Activation Licence Key.
Note: Click the ‘license.atl’ file, e.g ‘speaker_license.atl’ to download it to your computer > be sure to save this to a memorable computer location so that you can easily locate and upload it when activating your software.

5. Double-click the compressed folder to reveal the installer file.
6. Double-click the extracted .exe file > click ‘Run' to open the installation window.

7. Read through the license agreement and click ‘I accept the agreement’ > click ‘Next’.

8. Select the component (s) that you wish to install > click ‘Next’.

9. Choose and confirm the 64-bit plugin directory in which to save your software to > click ‘Next’.

10. Choose and confirm the 32-bit plugin directory in which to save your software to > click ‘Next’.

11. Review the installation and click ‘Install’.

12. The installation of your software has successfully completed > click ‘Finish’.

Offline Activation
1. Restart your DAW, and rescan your plugin selection to show the new installation (in the event it fails to appear).
2. Locate and open the plugin on an appropriate track. You will be greeted by the window shown below > click 'Offline'.

3. Load or drag and drop the downloaded Key License File into the box to activate your software.

4. The software is now activated and ready for use within your DAW.

Online Activation
1. Restart your DAW, and rescan your plugin selection to show the new installation (in the event it fails to appear).
2. Locate and open the plugin on an appropriate track. You will be greeted by the window shown below > click 'Online'.

3. Enter your registered account email and password details > click 'Log In'.

4. The software is now activated and ready for use within your DAW.

Mac
1. Visit the AudioThing Login/Registration Page and enter your personal details to set up an account > then read the 'Privacy Policy' and tick the box before clicking 'Sign Up'.
Note: If you already have an existing AudioThing account, Login here and skip to step 3 of the installation process.

2. A confirmation email will now be sent to your registered email > click the link within the email to activate your account and Login here.
3. Once logged into your account, visit the Redeem Page and copy and paste the serial number from your User Account into the box provided > then click 'Redeem'.

4. Download your preferred installer as well as the Activation Licence Key.
Note: Click the ‘license.atl’ file, e.g ‘speaker_license.atl’ to download it to your computer > be sure to save this to a memorable computer location so that you can easily locate and upload it when activating your software.

5. Double-click the .dmg file to open the installer window.

6. Double-click the installer icon to begin the installation process > click ‘Continue’.

7. Read the info and click ‘Continue’.

8. Read the Software License Agreement > click ‘Continue’ and then ‘Agree’.

8. Select the component (s) that you wish to install to your computer, and click ‘Continue’.

9. Review the installation and click ‘Install’.

10. The installation of your software has successfully completed > click ‘Close’.

Offline Activation
1. Restart your DAW, and rescan your plugin selection to show the new installation (in the event it fails to appear).
2. Locate and open the plugin on an appropriate track. You will be greeted by the window shown below > click 'Offline'.

3. Load or drag and drop the downloaded Key License File into the box to activate your software.

4. The software is now activated and ready for use within your DAW.

Online Activation
1. Restart your DAW, and rescan your plugin selection to show the new installation (in the event it fails to appear).
2. Locate and open the plugin on an appropriate track. You will be greeted by the window shown below > click 'Online'.

3. Enter your registered account email and password details > click 'Log In'.

4. The software is now activated and ready for use within your DAW.
