Free gifts available with your purchase

Vintage Drum Sampler / Sequencer
Sequel 2 is a drum sampler/sequencer that brings back the quick vintage drum machine workflow. It includes a library of famous drum machines and patterns, or add your own samples as well.
It now features a new real-time pitch engine and more sequencer functions per track. A new global compressor, Eq and reverb are now also added for that 80s Record vibe!
The Library
The Drum Kit Library included is also organized by vintage machines, processed kits, and also, as single category hits like: kick, snare, hats, etc.
This makes it easy to access these beautiful sounds and quickly get a beat going effortlessly, so you can produce and compose faster.
This is like having all the famous vintage drum machines in one box, at your finger tips, without the exorbitant prices they go at today.
Key Features
Want to replace any of the sounds in a kit with your sounds? No Problem. Just drag and drop your sample file onto the pads or choose from an included file browser built into the plugin.
Sequel 2 is a complete drum sampler with parameters such as pitch shift, Lp / Hp filters, pan, levels, and reverse sample, per pad/sample. You can also trim your samples by using the sample start and end controls.
This truly brings the quick and straightforward workflow of the Boom bap/hip hop beat-making to your finger tips.
You can also process your sounds using the multi-output for each sample pad to your daw channels and use your plugin collection. Assign any pad to any MIDI Keynote on a keyboard or controller.
*Additional features include sample content moving, so you can easily move your samples and content with one click to another drive without any hassle of copying of configurations.
All Controls on the plugin are MIDI mappable easily with a “right-click”. We have already assigned the pads for “Akai MPC Mini”, You can also assign the mads to any midi pad controllers.
Library Relocate
Easily place the content on any internal or external drive of your computer and just use the settings icon to locate your library once. You can move the content anywhere at any time and re-connect it with the plugin.
Interface
KIT PAGE
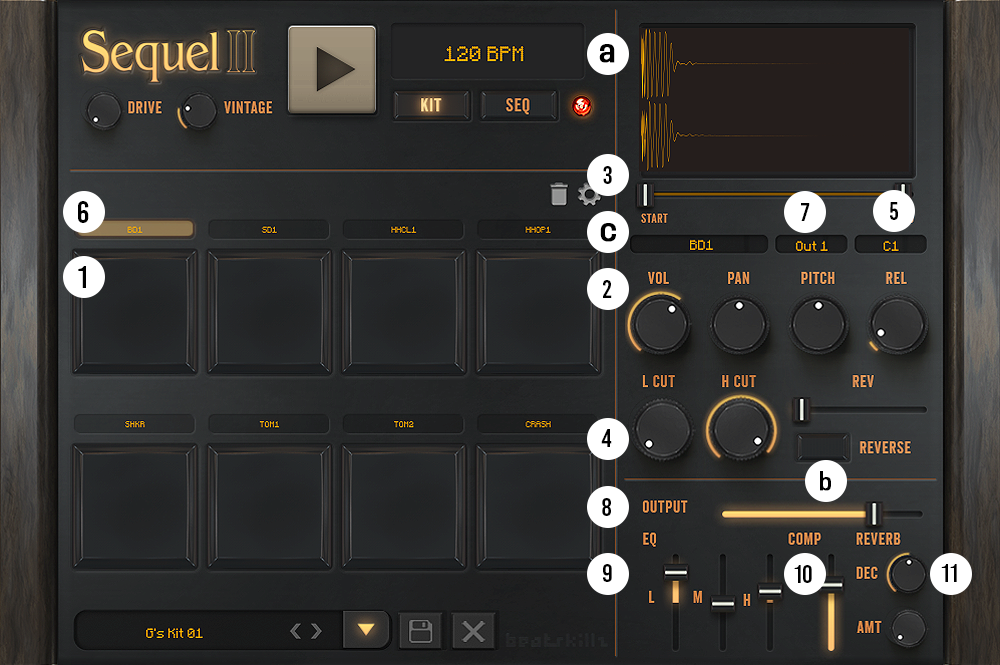
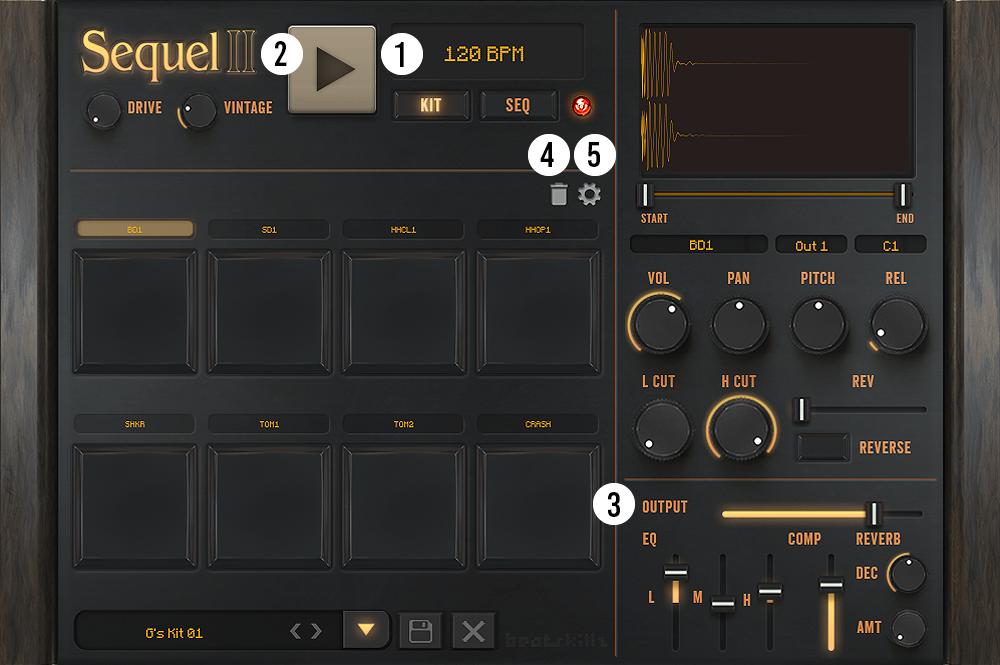
The Kit page is pretty straightforward, and as you can see, everything is laid out visually.
- 1 – 8 Sample Pad Slots
- 2 – Vol, Pan, Pitch, release controls for every pad.
-
3 – Side Panel: Control additional parameters per Pad such as:
- a: Sample Waveform (display) Sample Start and Endpoint controls for trim.
- b: Sample Reverse
- c: Sample select dropdown for choosing and auditioning other samples for placing on the Pad. You can choose from the included library or load your WAV, diff, Flac, or mp3 format samples. (*Sample length restricted to 5000 ms.)
- 4 – Filters: Hi-pass & Low passfilters provided for tone shaping per Pad.
- 5 – MIDI Note Assignment: Click and assign the selected Sample Pad to any note on your keyboard or MIDI Controller.
- 6 – The PAD selector button on top of each Pad lets you select the Pad whose parameters are to be modified in the control panel on the right.
- 7 – Multi-Output Settings
- 8 – Output Volume Button
- 9 – EQ – Adjust Low, Mid, High as per your needs.
- 10 – Compressor
- 11 – Reverb – Adjust Decay and the Amount
SEQUENCER PAGE
Playback:
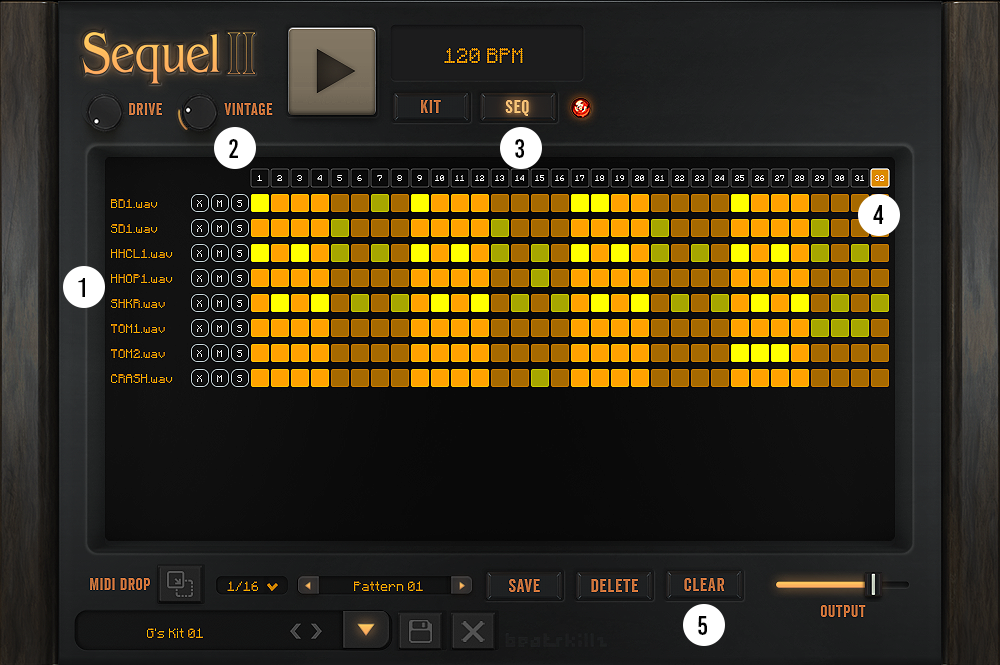
- 1 – The Seq page layout lists each of the 8 Tracks (pads) vertically on the left with the sample names assigned.
- 2 – The Grid window displays the 32 steps labelled.
- 3 – When the sequencer plays in sync with the DAW or internally, you can see a marker on the 32 steps, which moves to indicate the current step the sequencer is playing.
- 4 – Clicking on any step numbers will create a loop in the sequence that cycles between Step 1 and the Selected Loop End step. It will turn the colour of the selected step number to Yellow to visually indicate the Loop Endpoint.
- 5 – The clear button on the top left corner will clear the entire sequence and reset it with a single click.
Sample Triggers:
- 1 - The orange squares represent each step-per track which is empty and doesn't have a trigger on it. If a trigger is placed on a step, its colour changes to yellow. Clicking the mouse button on the square will enable the trigger or disable it in a toggle-button-like fashion and turn the colour of the step number to Orange.
- 2 - One can also click the mouse and drag in a row for continuous trigger placement or steps.
- 3 - The same can be done for erasing steps continuously.
Seq Row Parameters:
-
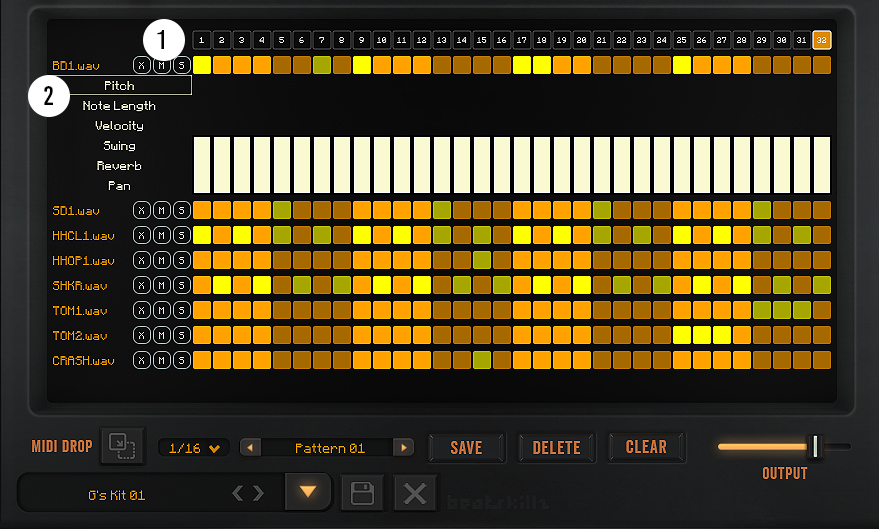
1 - Each row has three controls you can use:
- X: Clears the entire row & deletes all triggers placed in that row.
- M: Mutes the triggers in the row temporarily; if you press again, it will again unmute and play the programmed sequence.
- S: Solo button will play the sequence programmed in the row and mute all these sequences for the other pads.
-
2 - Sequence Parameters: Click on the row to expand the six rows for sequencing:
- Pitch – Adjust Pitch (-12 to + 12 semitones)
- Note Length – Adjust Note length (Range : 0 to 3 ms )
- Velocity – Adjust Velocity per step-per sample PAD ( Range: 0 to 127 )
- Swing – Add Swing by Adjusting the % as per your need.
- Reverb – Adjust Reverb Range ( 0 Semitones to 1 Semitone)
- Pan – Adjust Panning from Left to Right/ Right to Left
Drag upwards on a step on the desired parameters and Pre-program its value on each step, and you can also click and hold down the button and draw the shape across the steps. This is great for creating a dynamic movement within the pattern for more expression in the sequence.
PATTERN SECTION
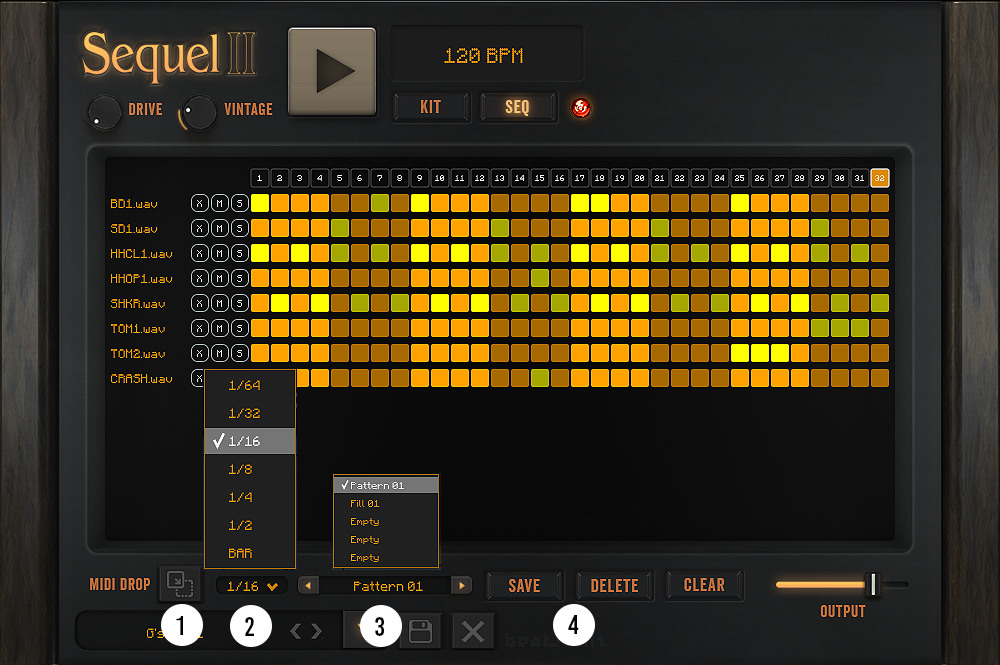
- 1 - MIDI DROP: Click on this button, drag and drop the current MIDI sequence into your DAWs MIDI or instrument track, and then switch off your sequencer using the SEQ On/off button on the bottom left corner of the interface. Now your pattern has been transferred to your DAW and will play from there. This is an excellent way to make many patterns and arrange your song within your DAW for a more complex arrangement made from patterns created in Sequel.
- 2 - Time Division Drop Down Menu: Select a time division for the sequencer per step. Choose from: 1 BAR, 1/2, 1/4, 1/8, 1/16, 1/32 & 1/64 Time Divisions per step.
- 3 - Pattern Navigation: Choose a pattern slot from the five slots available. Store your own patterns or use the factory patterns included per drum kit. You can also change the pattern online using the "< "and">" buttons from the selection of 5 patterns per Kit.
- 4 - Pattern Save & Clear: Save your own pattern using this button and then save the drum Kit to retain all the kit settings and the sequencer patterns. Use the Clear button to delete a saved pattern and make room for a new one.
GLOBAL CONTROLS
- 1 –Tempo Display: This displays the current tempo set in your DAW and will update to any tempo changes you make in your DAW. Sequel’s sequencer will sync to your DAW tempo.
- 2 – Play/Stop: This button will play or stop the pattern selected or created on the SEQ page. This works in conjunction with the SEQ on/off switch. If the SEQ switch is set to on, the sequencer will play the pattern; else, it will not play the pattern.
- 3 – Output: This controls the output mix level of the drum machine. Everything assigned to the main output 1-2 is mixed here, and the overall level of the plugin can be controlled here. The range is -inf to +6dB.
- 4 – Pads Clear “Bin Icon” – Its function is to remove all samples assigned to all 8 pads. The primary use is to clear up a preset so that the user can load their one desired sound from scratch and build their own kits.
- 5 – Settings: ” Gear Icon” – This button allows the user to change the default location of the sample library to the user’s desired location, maybe on an external drive to save space on the Operating System drive of their computer.
PRESETS SECTION
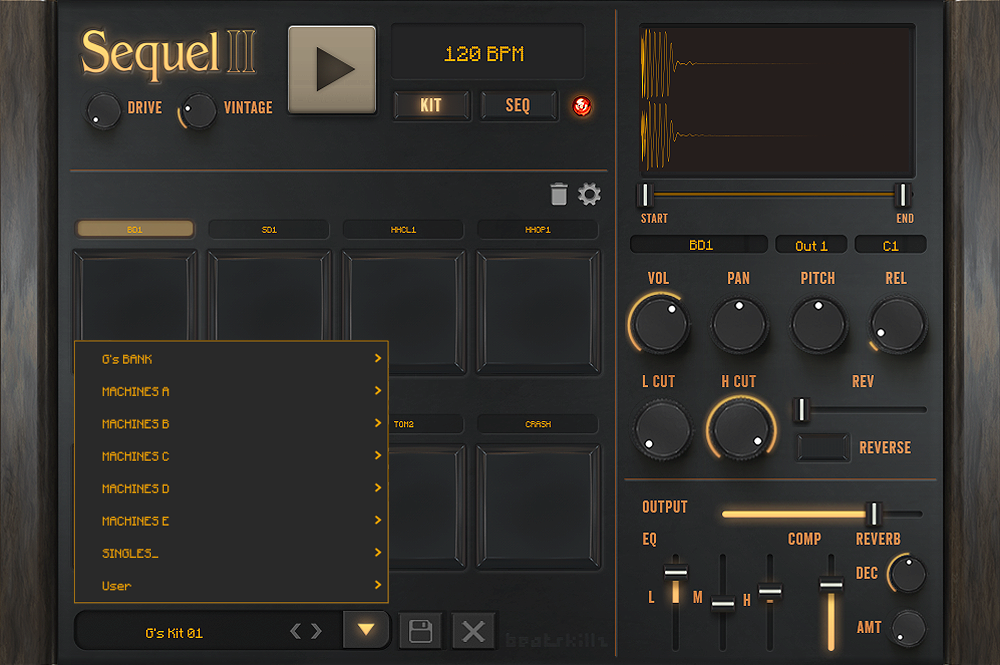
This allows the user to select and navigate between the different factory presets and folders and the user-created kits with ease. Save and Delete kits on the fly quickly. Navigate forward or backwards in the preset list with the "< "and ">" buttons.
System Requirements
Mac
- macOS 10.14 Mojave or later (macOS Big Sur / M1 Mac supported)
- VST3, AU, AAX (64-bit only)
- Intel i5 or later / AMD Athlon 64 or equivalent
- 2 GB RAM / 300 MB HD Required
- Screen resolution: 1024×768
Windows
- Windows 10 or later
- VST3, AAX (64-bit only)
- Intel i5 or later / AMD Athlon 64 or equivalent
- 2 GB RAM / 300 MB HD
- Screen resolution: 1024×768

