Log In

Free gifts available with your purchase
![]()
PEEL STEMS brings real-time stem separation to almost every DAW.
Isolate instruments or vocals – and remix, rebalance or remove stems in already mixed audio. All in real-time. All directly inside your DAW, right on the track you are working on.
PEEL STEMS is a plugin for real-time stem separation in any VST3-, AU- or AAX-compatible DAW. Simply bring it up as an insert on a track, and get creative with mixed audio as if you had access to its separate tracks.
PEEL STEMS is based on zplane’s new STEMS EFFICIENT technology and highly optimized for real-time low-latency processing. Of course, PEEL STEMS still needs to “read ahead” in order to separate audio inside a mixed track. But in most cases this latency is automatically compensated by the DAW. So now, removing vocals or bass in a loop is as simple as muting that stem while you are playing it back!
REMOVE
You’d like to remove the vocals or bass in a mixed loop? Simply deactivate the stem by pressing its power switch and you’re ready to add your own. Of course, you can also use this feature to isolate and export stems for dedicated processing
REBALANCE
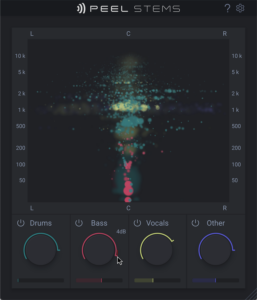
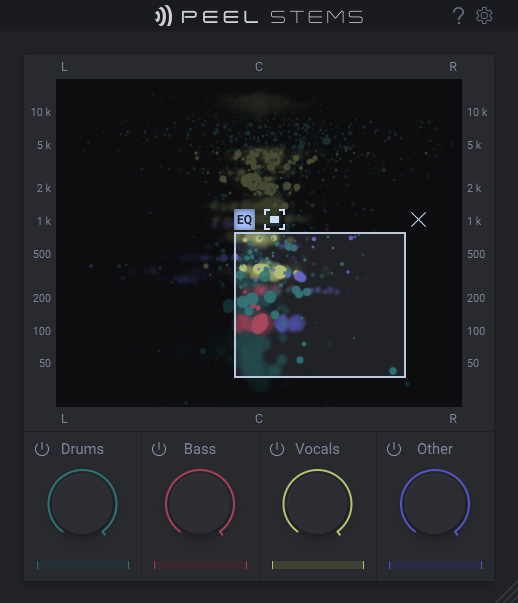
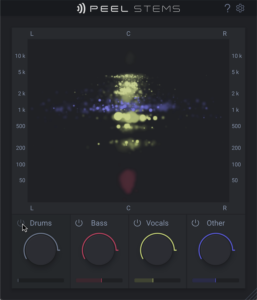
PEEL STEMS can be a valuable tool to rebalance mixes and masters: The dedicated stem volume controls give you access like working with multiple tracks. And the Soundfield Display ensures that you see what’s going on: Each stem is indicated in its own color and shows its frequency range and stereo-field expansion in real-time. An invaluable mixing tool!
REMIX
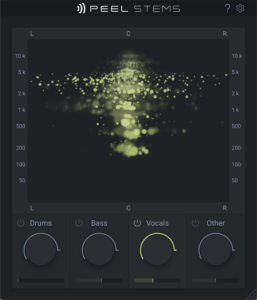
Pick JUST the drums, the vocals or other elements from a mixed track and add them to your beats and productions. Simply solo the stem you want, you won’t even have to stop playback or bounce anything. Or mute stems in order to create drops when performing with mixed tracks. PEEL STEMS does all of this in real-time!
REFINE
PEEL STEMS incorporates the unique PEEL Focus EQ: Simply click & drag the mouse across the Soundfield Display to activate and set it. Using Invert, you can separate the audio inside the Focus Window from the rest outside. And in some DAWs (eg. Ableton LIVE), you can even use PEEL STEMS’ second plugin output to separate both for further processing. This way you can add reverb to just the snare, pump up the kick drum …and a lot more. Get creative with your audio!
Features
- Real-time audio stem separation
- Soundfield Display: Visually identify single stems in a mix
- Mute, Solo or Rebalance stems (Drums, Bass, Vocals, Other)
- Includes all PEEL features including the Focus EQ
- Route selected audio to external processing (supported in Ableton Live, FL Studio, Pro Tools, Reason, Reaper)
System Requirements
Windows
- Windows 10 or higher
- VST3 and AAX formats
Mac
- macOS 10.12 or higher (compatible with Intel and M1-based Macs)
- VST3, AU and AAX formats

Sound on Sound
Award-winning recording & music technology magazine
“It’s not difficult to see PEEL’s potential; there are lots of creative ways it could be used…”