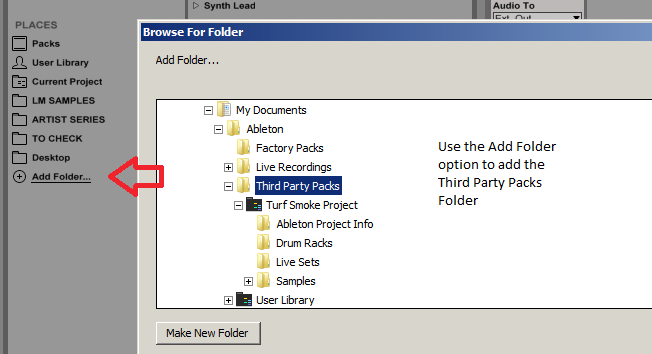
Ableton Live 9+
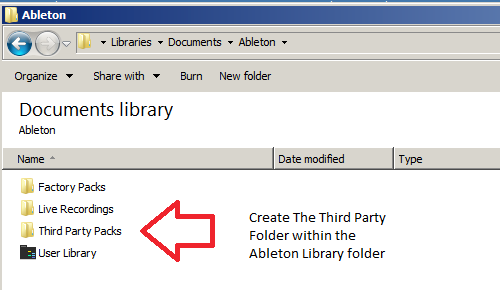
1. Create a folder entitled 'Third Party Packs' within the Ableton Library folder.
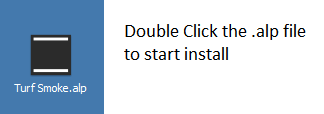
2. Download the .zip folder provided within your User Account > double-click it to extract its contents and then locate the .alp file.
3. When opening Ableton Live, the program will ask where you wish to install the project folder.
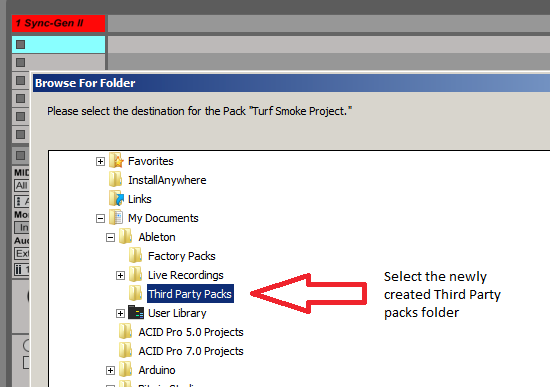
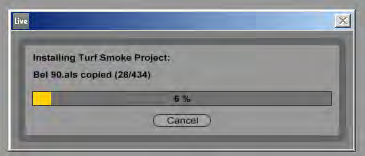
4. Locate the 'Third Party Packs' folder that you created in step 1. of the installation process, and select 'OK' > Live will then begin the unpacking process.
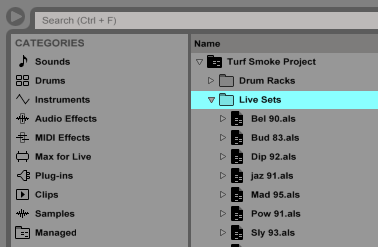
5. Once the unpacking is complete, you now need to inform Ableton Live of where the sample pack is located > from the browser window, select 'Add Folder' and navigate to the project folder where you installed the pack (inside the 'Third Party Packs' folder).
The Pack is now Installed and Ready for Use Within Ableton
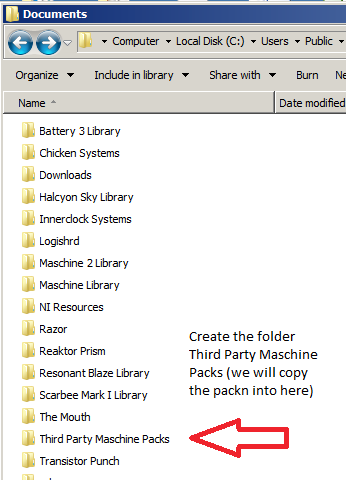
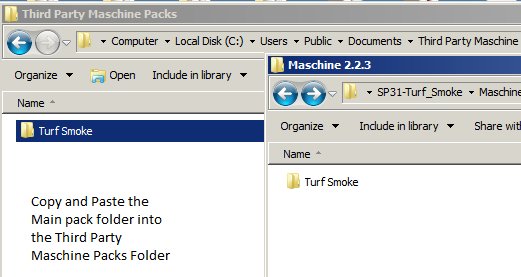
Maschine 2.2.3+
1. Create the folder titled 'Third Party Maschine Packs' > it is advisable to perform this in the same root folder as the Maschine Library, but it can be also be anywhere on your computer.
2. Download the .zip folder provided within your User Account, and double-click it to extract the main folder > copy and paste the contents of the Maschine 2.2.3 folder to the 'Third Party Maschine Packs' folder that you created in the previous step (Step 1.).
3. Open Maschine 2 and select the 'Preferences' tab from the menu > Select the 'User Paths' tab and then click 'Add'. From the pop up window locate the 'Turf Smoke' folder.
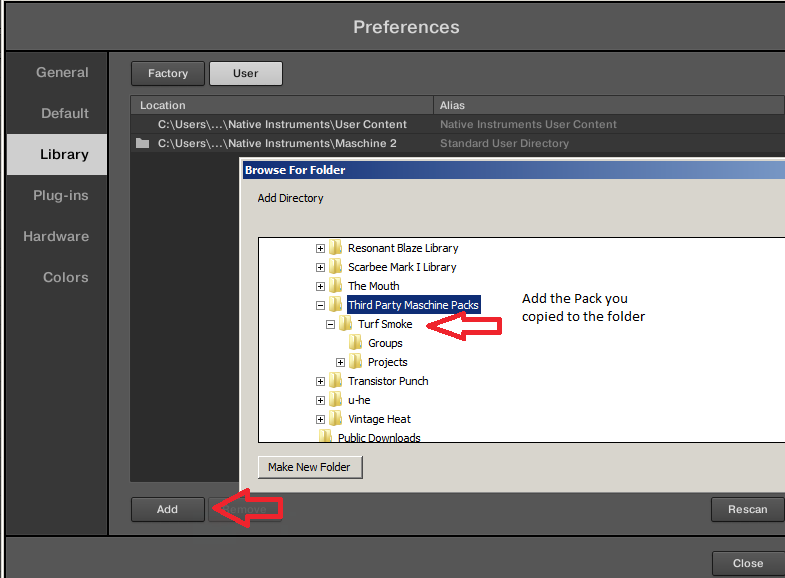
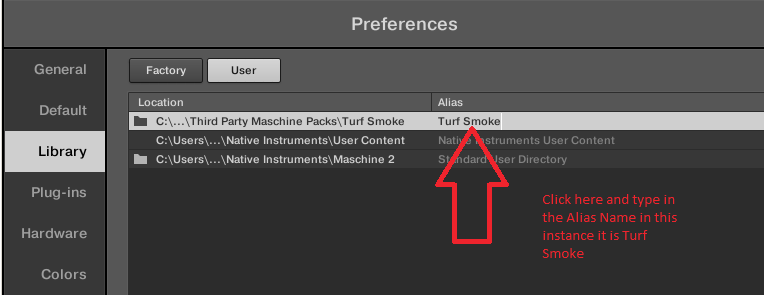
4. Important note: At this stage of the installation process, it is imperative to add an alias - to perform this double-click below the Alias box, and enter/type in the Alias name which will always be the same name as the pack's root folder name.
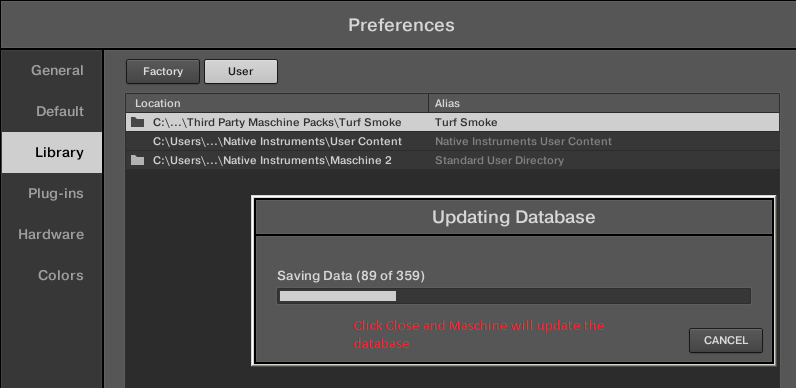
5. Select 'OK' and Maschine will now scan and add the contents of the pack to its database.
6. To Load content from the pack, go to the 'File Type Selector', ensuring that you have user presets selected first > press the 'Projects/Groups/Samples' icons and your content will now be visible and ready to load.
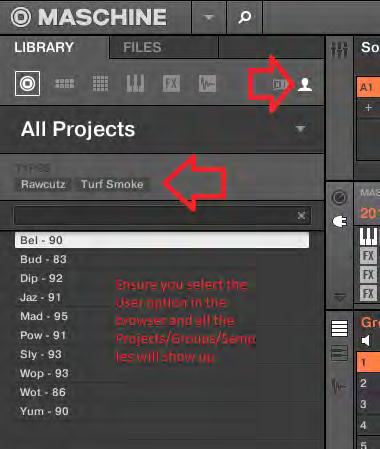
7. All content from the collection has been appropriately tagged, ready for easy file browsing.
Rex Files
1. Download the .zip folder provided within your User Account, and double-click it to extract the main folder.
2. Rex files can be loaded in the ‘Dr. OctoRex’ player in Reason. Simply click the ‘Browse Patch’ tab, and locate the file you require. You can load up to 8x Rex files into the available slots.
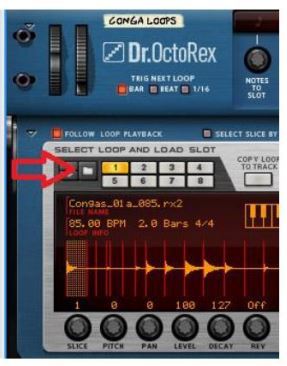
3. The Rex files are now ready for use within the Dr.OctoRex Player.
Sampler Patches
Halion
1. Download the .zip folder provided within your User Account, and double-click it to extract the main folder.
2. Copy/save the entire extracted sample pack folder to your computer or hard drive, ensuring that all folder structure remains intact.
3. When loading Halion patches you may need to locate the samples > this is simply done by double-clicking the '.fxp' file (Halion Patch) within the Halion browser window, and when prompted click on the automatic or manual search button > then locate the root folder of the pack that you have purchased.
4. Halion will now find the samples for the patch. It is advisable to resave the patch, so you will not have to repeat this procedure.
5. The sample pack is now ready for use within Halion.
EXS24
1. Download the .zip folder provided within your User Account, and double-click it to extract the main folder.
2. Copy/save the sample pack folder to the 'Sampler Instruments' folder within Logic > this folder is located via the folder path below:
- username/Library/Application Support/Logic/Sampler Instruments
3. The sample pack is now ready for use within EXS24.
NN-XT
1. Download the .zip folder provided within your User Account, and double-click it to extract the main folder.
2. Copy/save the entire sample pack folder to your computer or hard drive, whilst ensuring that all folder structure remains intact.
3. Select the 'Load Patch' tab on the NNXT user interface and use Reason’s browser to locate the NNXT folder within the sample pack > you will now be able to load your desired patch.
4. The sample pack is now ready for use within NN-XT.
Kontakt
1. Download the .zip folder provided within your User Account, and double-click it to extract the main folder.
2. Copy/save the entire sample pack folder to your computer or hard drive, whilst ensuring that all folder structure remains intact.
3. Use Kontakt’s browser to locate the 'Kontakt' folder within the sample pack, and then load desired patch.
4. The sample pack is now ready for use within Kontakt.
Reason 4 Refill
1. Download the .zip folder provided within your User Account, and double-click it to extract the main folder.
2. Copy/save the '.rfl' file to the Reason installation folder on your computer's hard drive.
3. Use Reason’s browser to load instruments or effects from the refill pack > this is located by following the folder path below:
- username/Library/Application Support/Logic/Sampler Instruments
4. Open Refill within Reason, and the new presets will now be available for use within the sampler's browser area.


 Log In

