


 Log In
iZotope Neutron 4: Everything You Need To Know
iZotope’s mixing package keeps getting bigger and better. While version 3 brought us the Mix Assistant, Visual Mixer and Balance Assistant (which was three years ago), there’s been plenty of time for the Massachusetts AI-fanciers to develop a stunning follow-up.
Neutron 4 contains a few new additions, some quality-of-life tweaks, and even a couple of complete overhauls. The Mix Assistant is transformed into Assistant View, a whole eco screen that helps you define and reach a spectral target, and takes control over three parameters that give a sound its real personality. The Compressor’s new Punch mode is a simple way to squeeze or expand a track. And the Exciter is enhanced with distortion from iZotope’s Trash 2 plugin, as well as some new distortion customization options.
Let’s have a look at Neutron 4’s new features in more detail.

The Unmask Module
This new module – and standalone plugin for Neutron Advanced users – lets you quickly solve mix problems by dynamically EQing offending frequencies in one channel, helping the audio it’s competing with to shine through.
Here we have a piano and a synth patch in a DAW project. Both parts play very different musical roles – chords vs rhythm – but they’re still competing for attention in the mix.
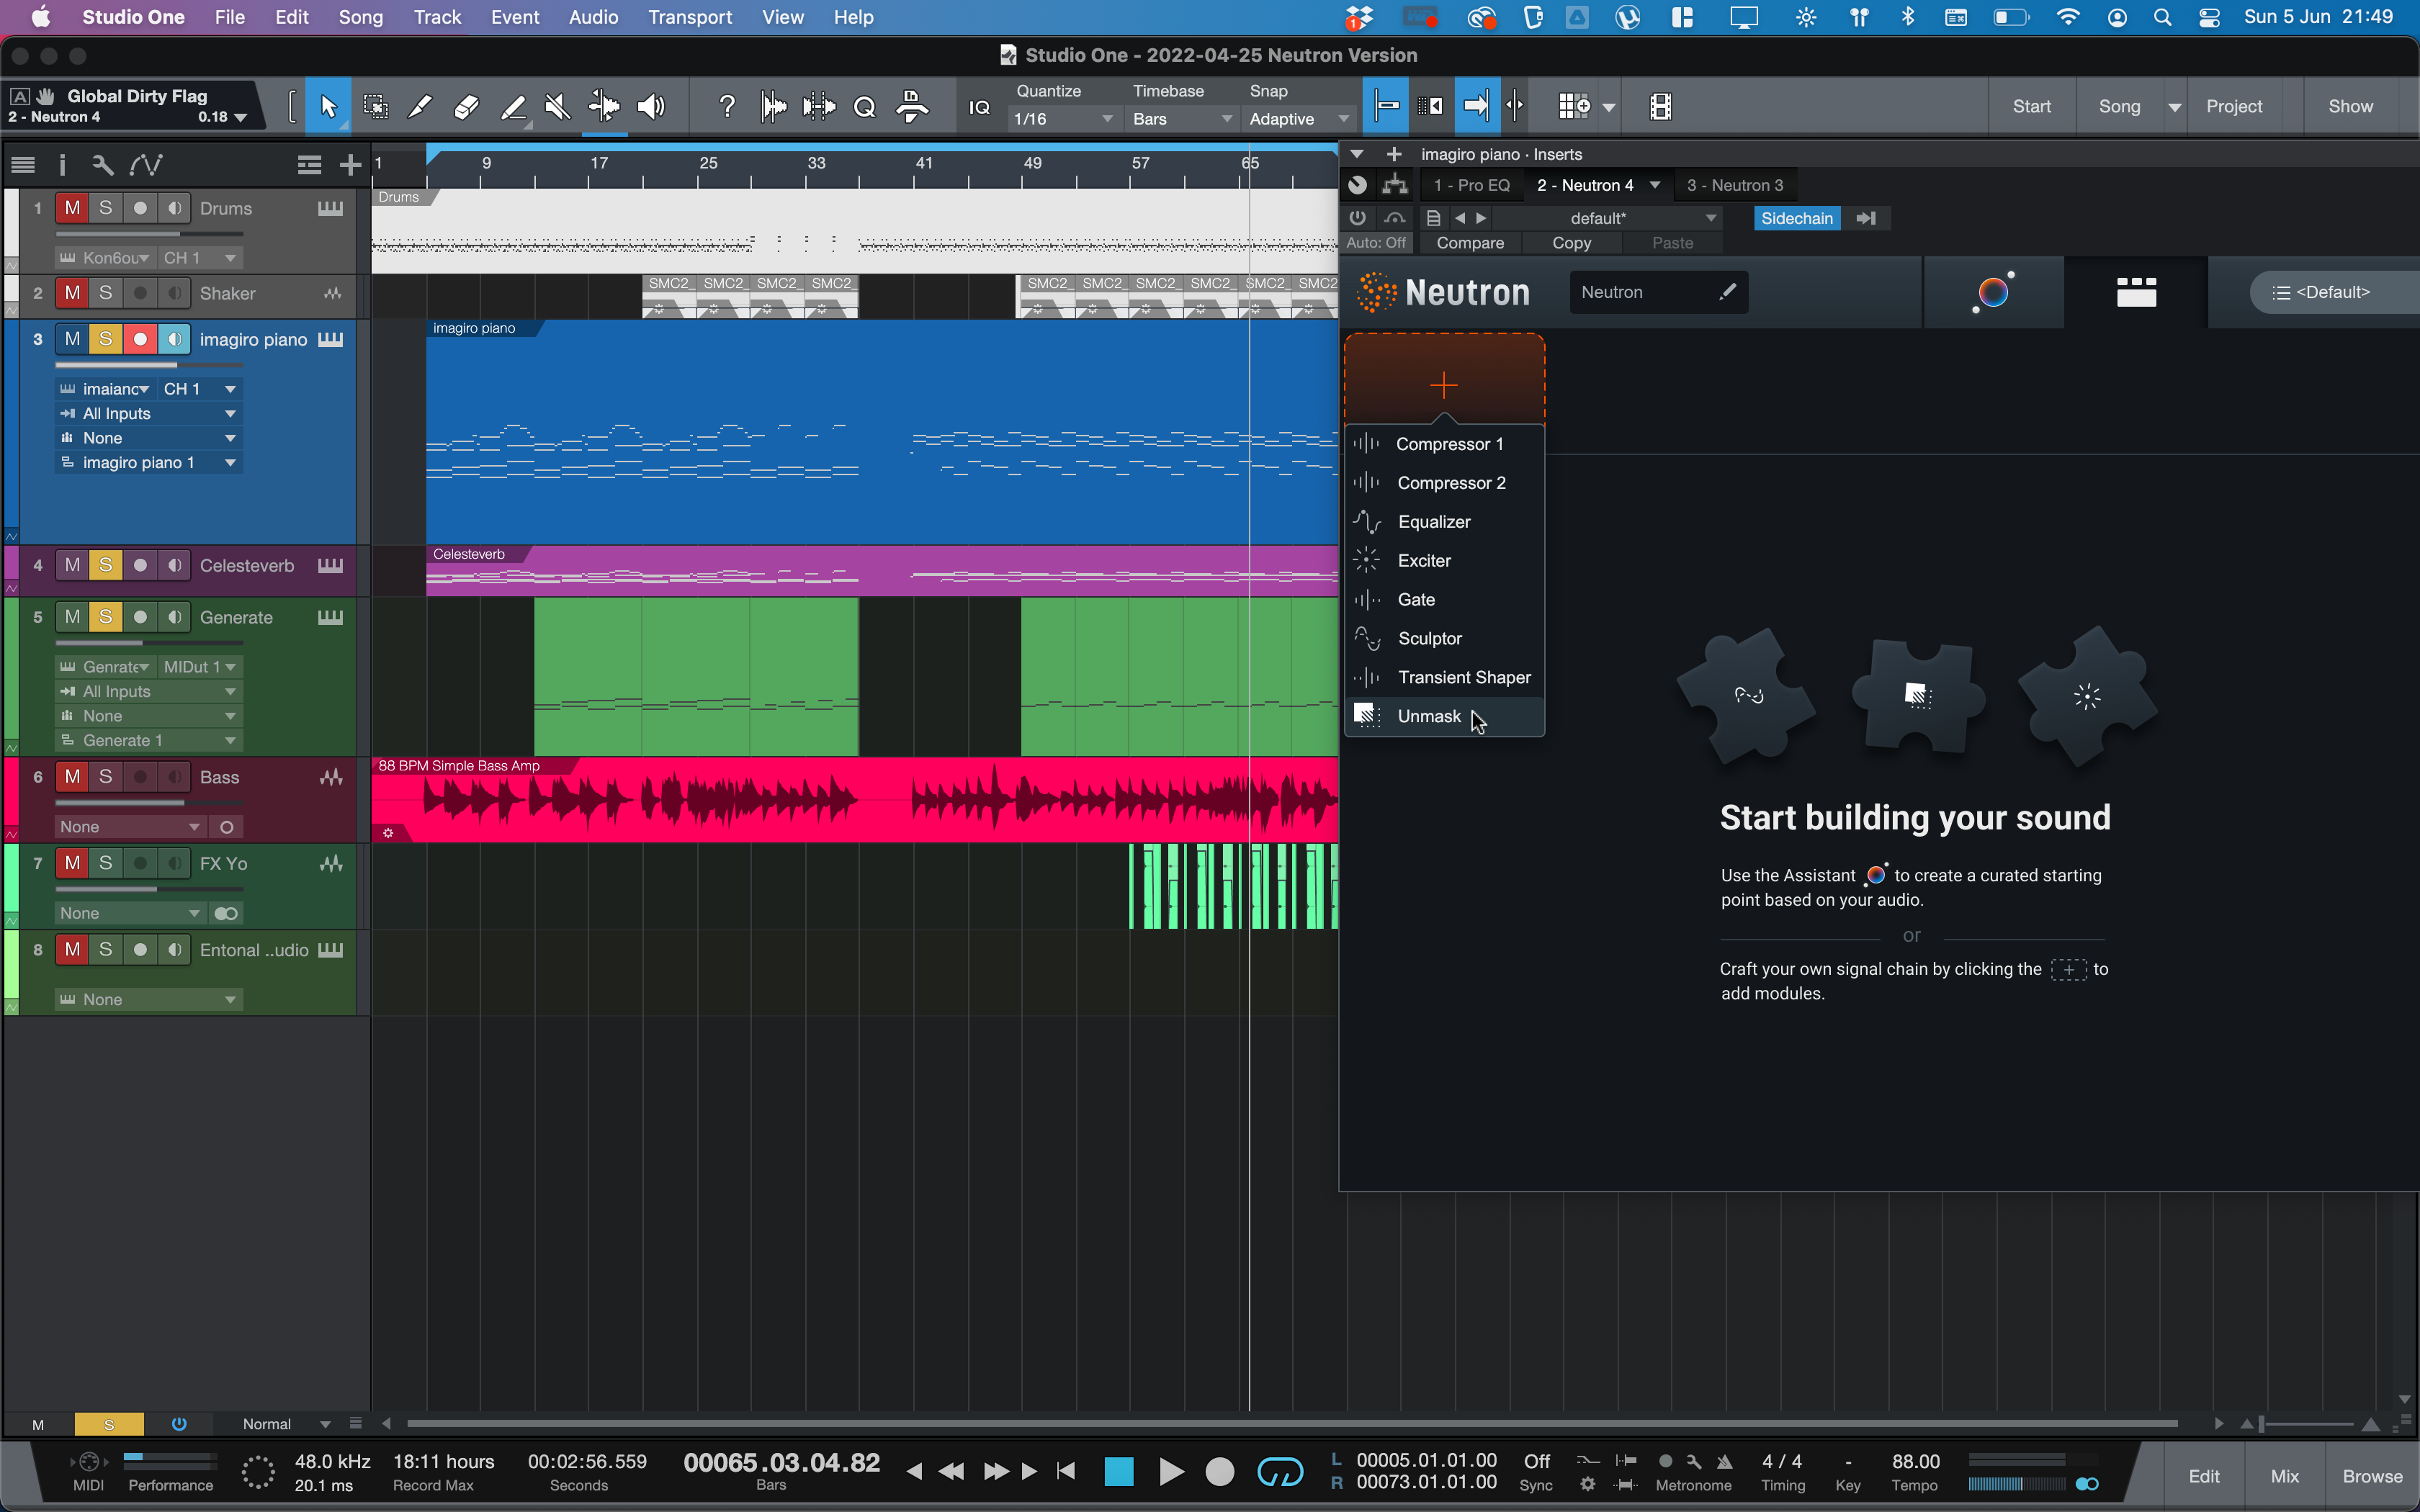
On the piano track, we load Neutron 4, remove the default EQ module, and click the empty box’s plus sign to select the Unmask module.
The module immediately asks us to insert the track we want to unmask as the sidechain input to this one. We route the synth track as the sidechain in our DAW.
When we press play, the Unmask module immediately gets to work, carving out frequencies in the piano that are clashing with the synth.
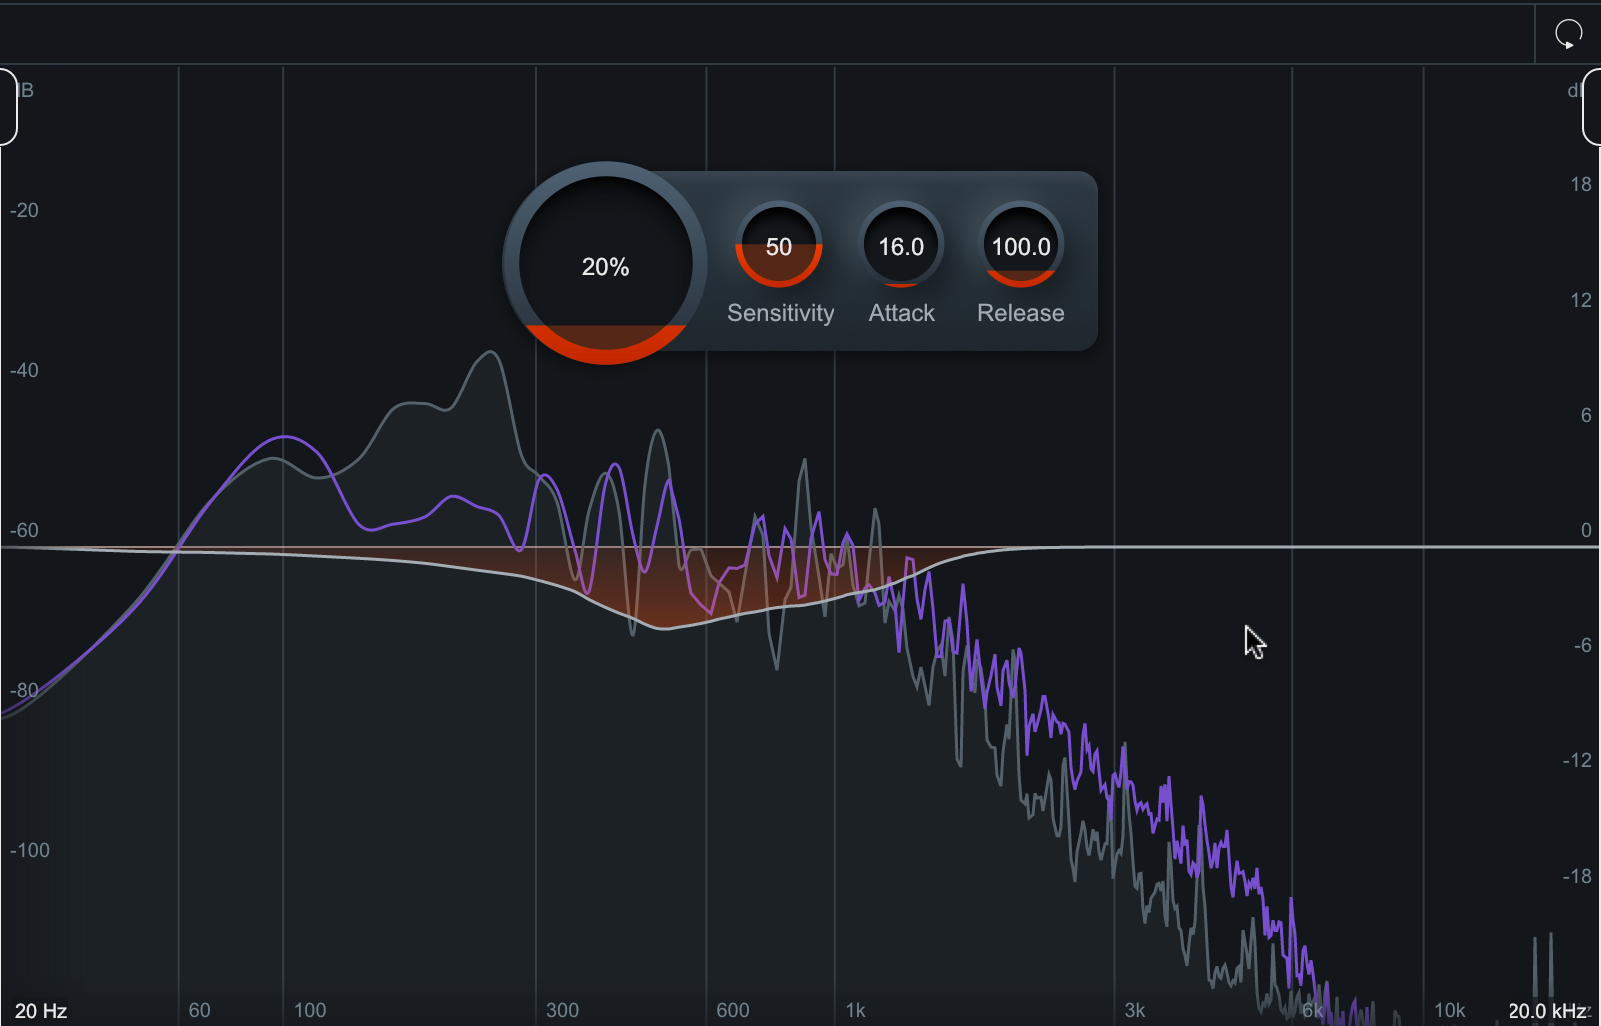
There are two key advantages of using the Unmask module instead of EQ: For one, it’s a dynamic effect, only kicking in on the piano channel when the synth plays. Also, the frequencies of the unmasking ‘duck’ will change as the synth notes move higher or lower.
You can turn up the large ‘amount’ control to increase the effect, and increase the Sensitivity to make it more likely to trigger. This can give a dramatic clarity in our synth sound, but it can start to hurt our piano at higher levels.
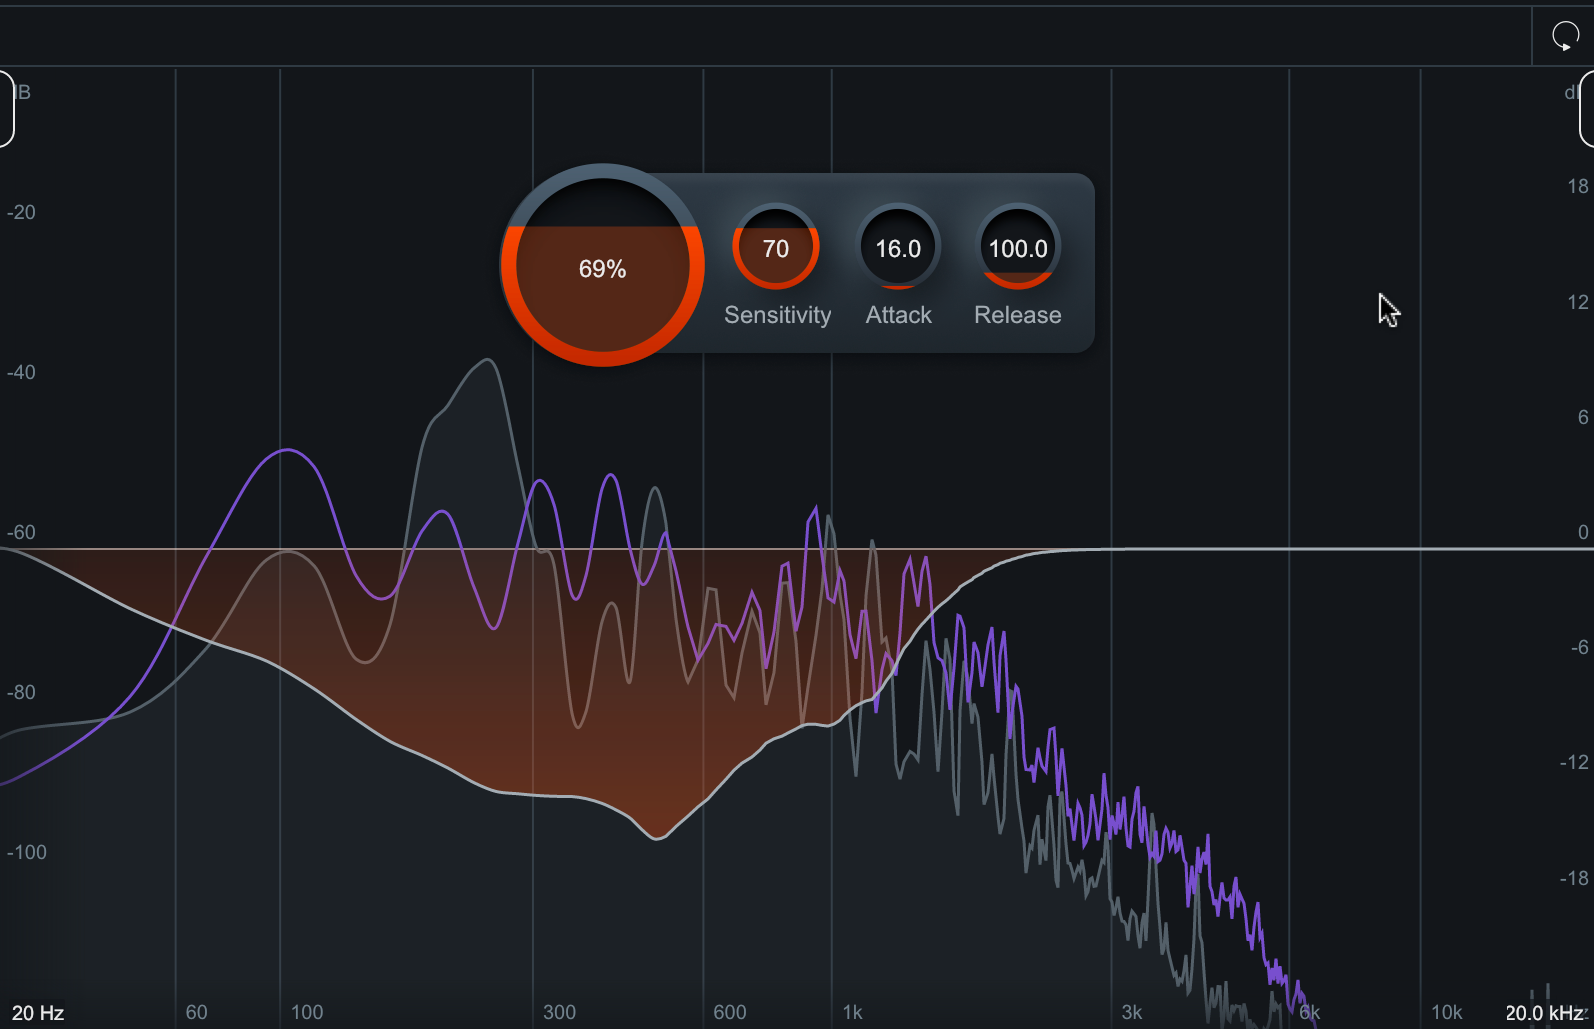
You can also dial in Attack and Release parameters for the Unmask module, making it more precise if you’re ducking, say, bass against a kick, or toms against a bassline.
Not only that, but you can filter the whole effect by dragging the low-cut and high-cut handles, keeping the unmasking to a certain range if you wish.

Assistant View in Action
Let’s dive into the real headline feature in Neutron 4: The Assistant View. While the previous Mix Assistant asked you to answer some questions before it did its thang, the Assistant View goes directly into listen mode, then makes up its mind about what type of track you’re playing it, and what modules would work well with it.

When that’s done, we arrive at a screen that’s new to Neutron. However, the Assistant has decided that our smooth-as-butter e-piano part is actually a bass…
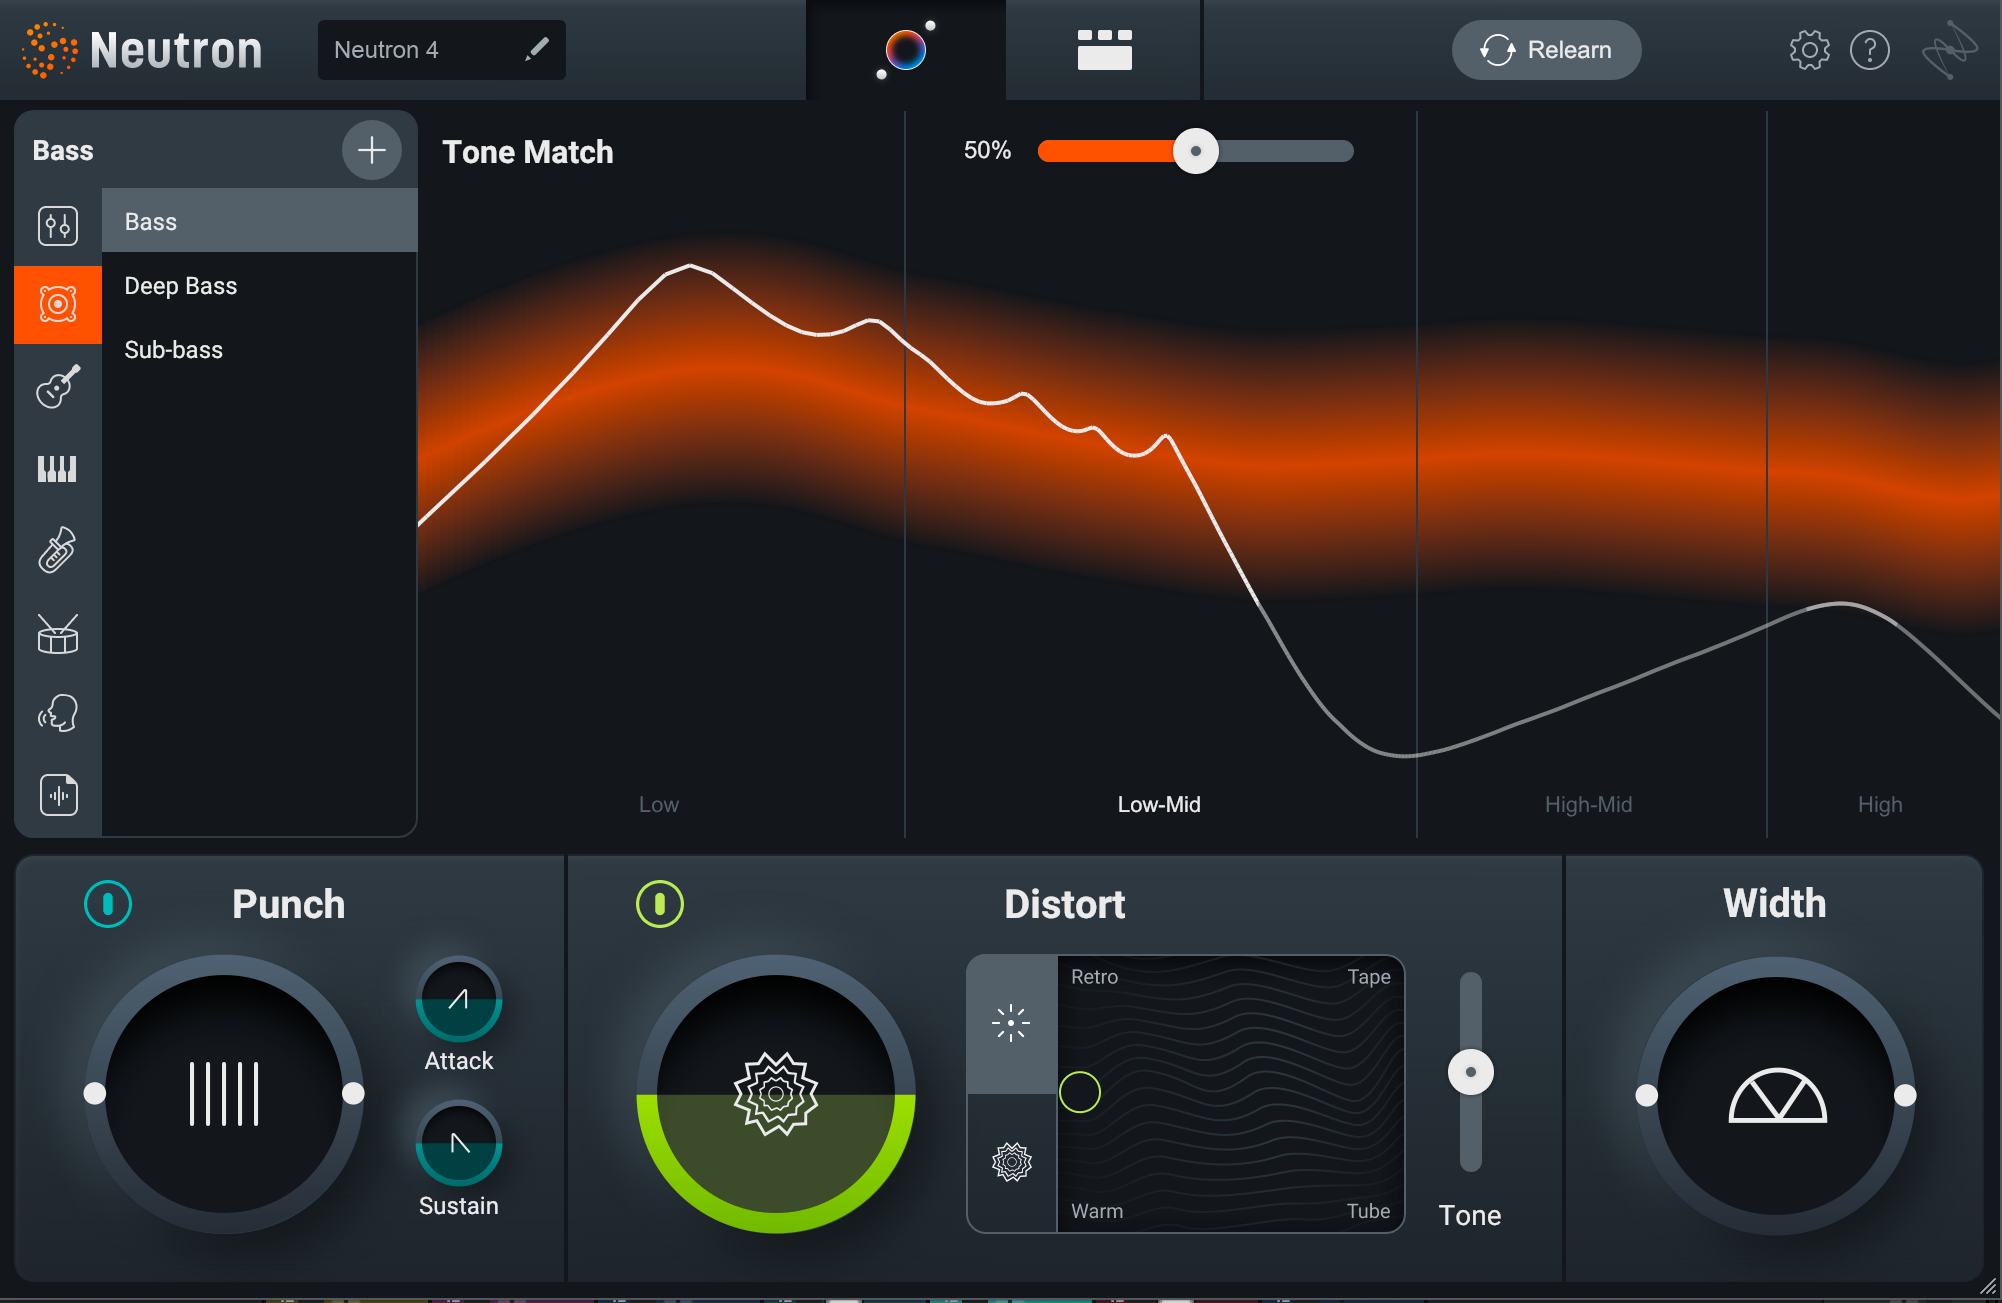
We can redefine what the part should be, informing Neutron 4 of our ‘Electric Piano’ by selecting it on the left-hand side.
From here, Neutron gives us a target curve in the main panel, seen in Orange, with our current audio spectrum traced in white.
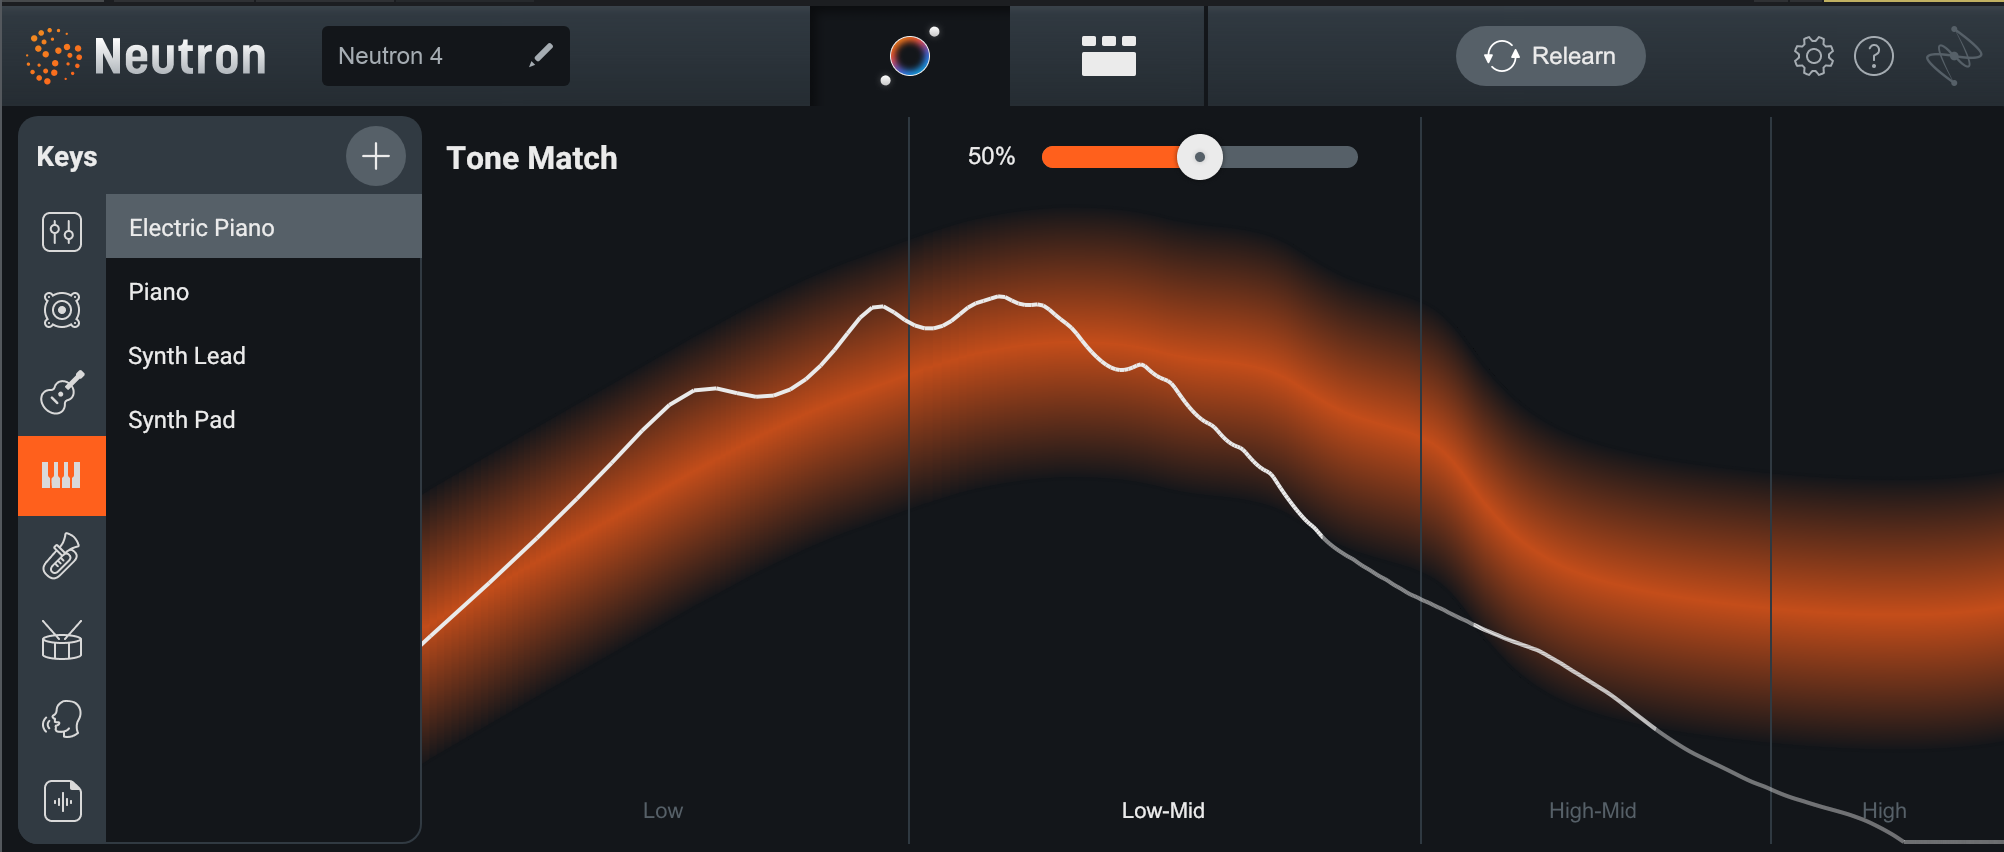
Using the Tone Match slider at the top of the plugin, we can force the audio (where possible) to conform to the target orange line. This actually happens with a combination of processes using the EQ under the hood. You can see what’s happening by heading back to the ‘classic’ Detailed View should you wish.
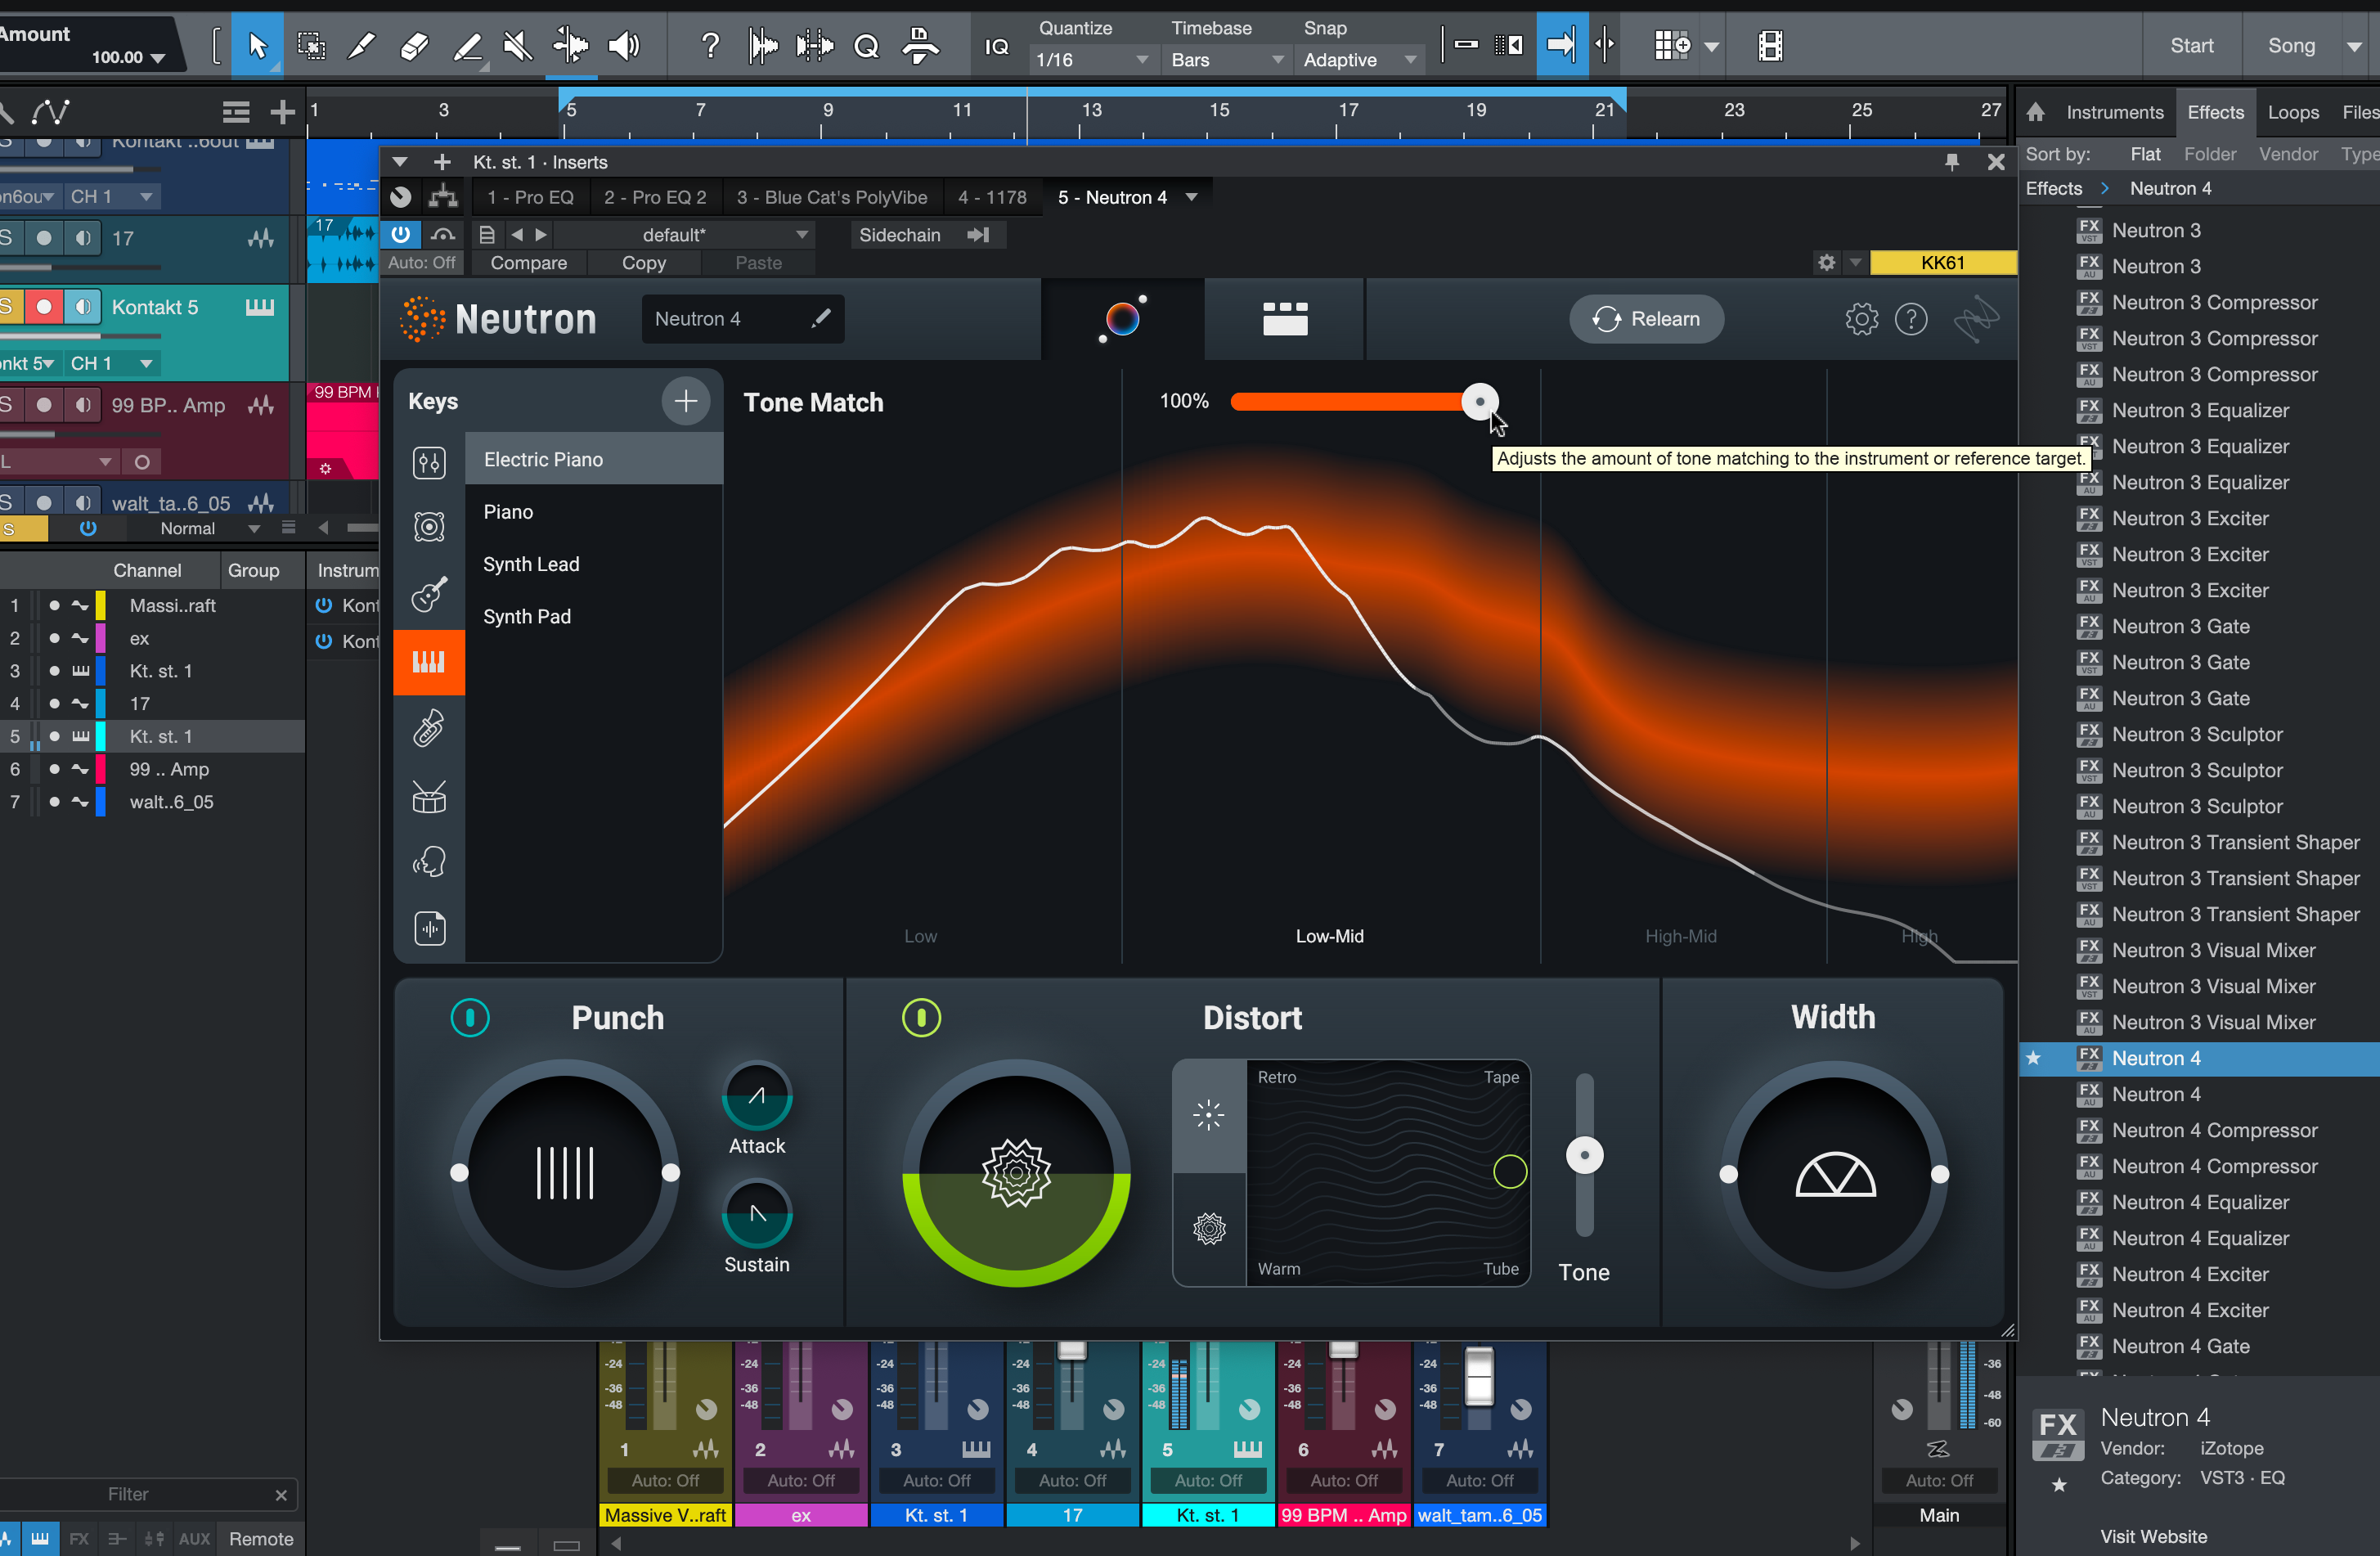

Aside from the target curve, there are three key modules that have appeared below. These are Punch, Distort and Width.
These controls bring out two of the new modes discussed later in this article – the Punch compressor and the enhanced Exciter – as well as Neutron’s main Stereo Width control. In actual fact, they mean that a Compressor set to Punch mode, plus an Exciter, have been added to the Detailed View behind the scenes.
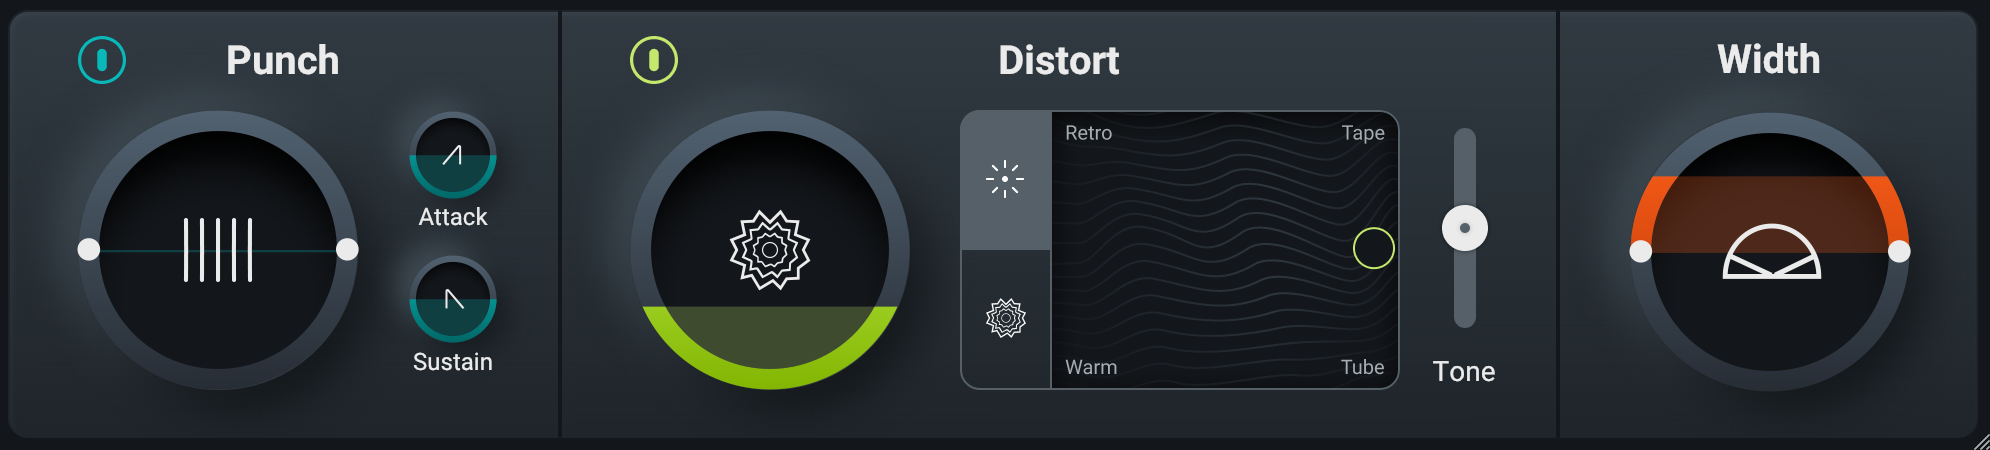
The three modules in Assistant View actually function as macros for the modules. Their main controls are mirrored in the actual controls of the individual Compressor and Exciter modules, and the changes will reflect in the modules themselves if you tweak and then change views. The Width control, meanwhile, is based off the Detailed View’s output Width dial.
And so, back to the Detailed View, where we can inspect what the Assistant has actually done with the plugin’s modules.
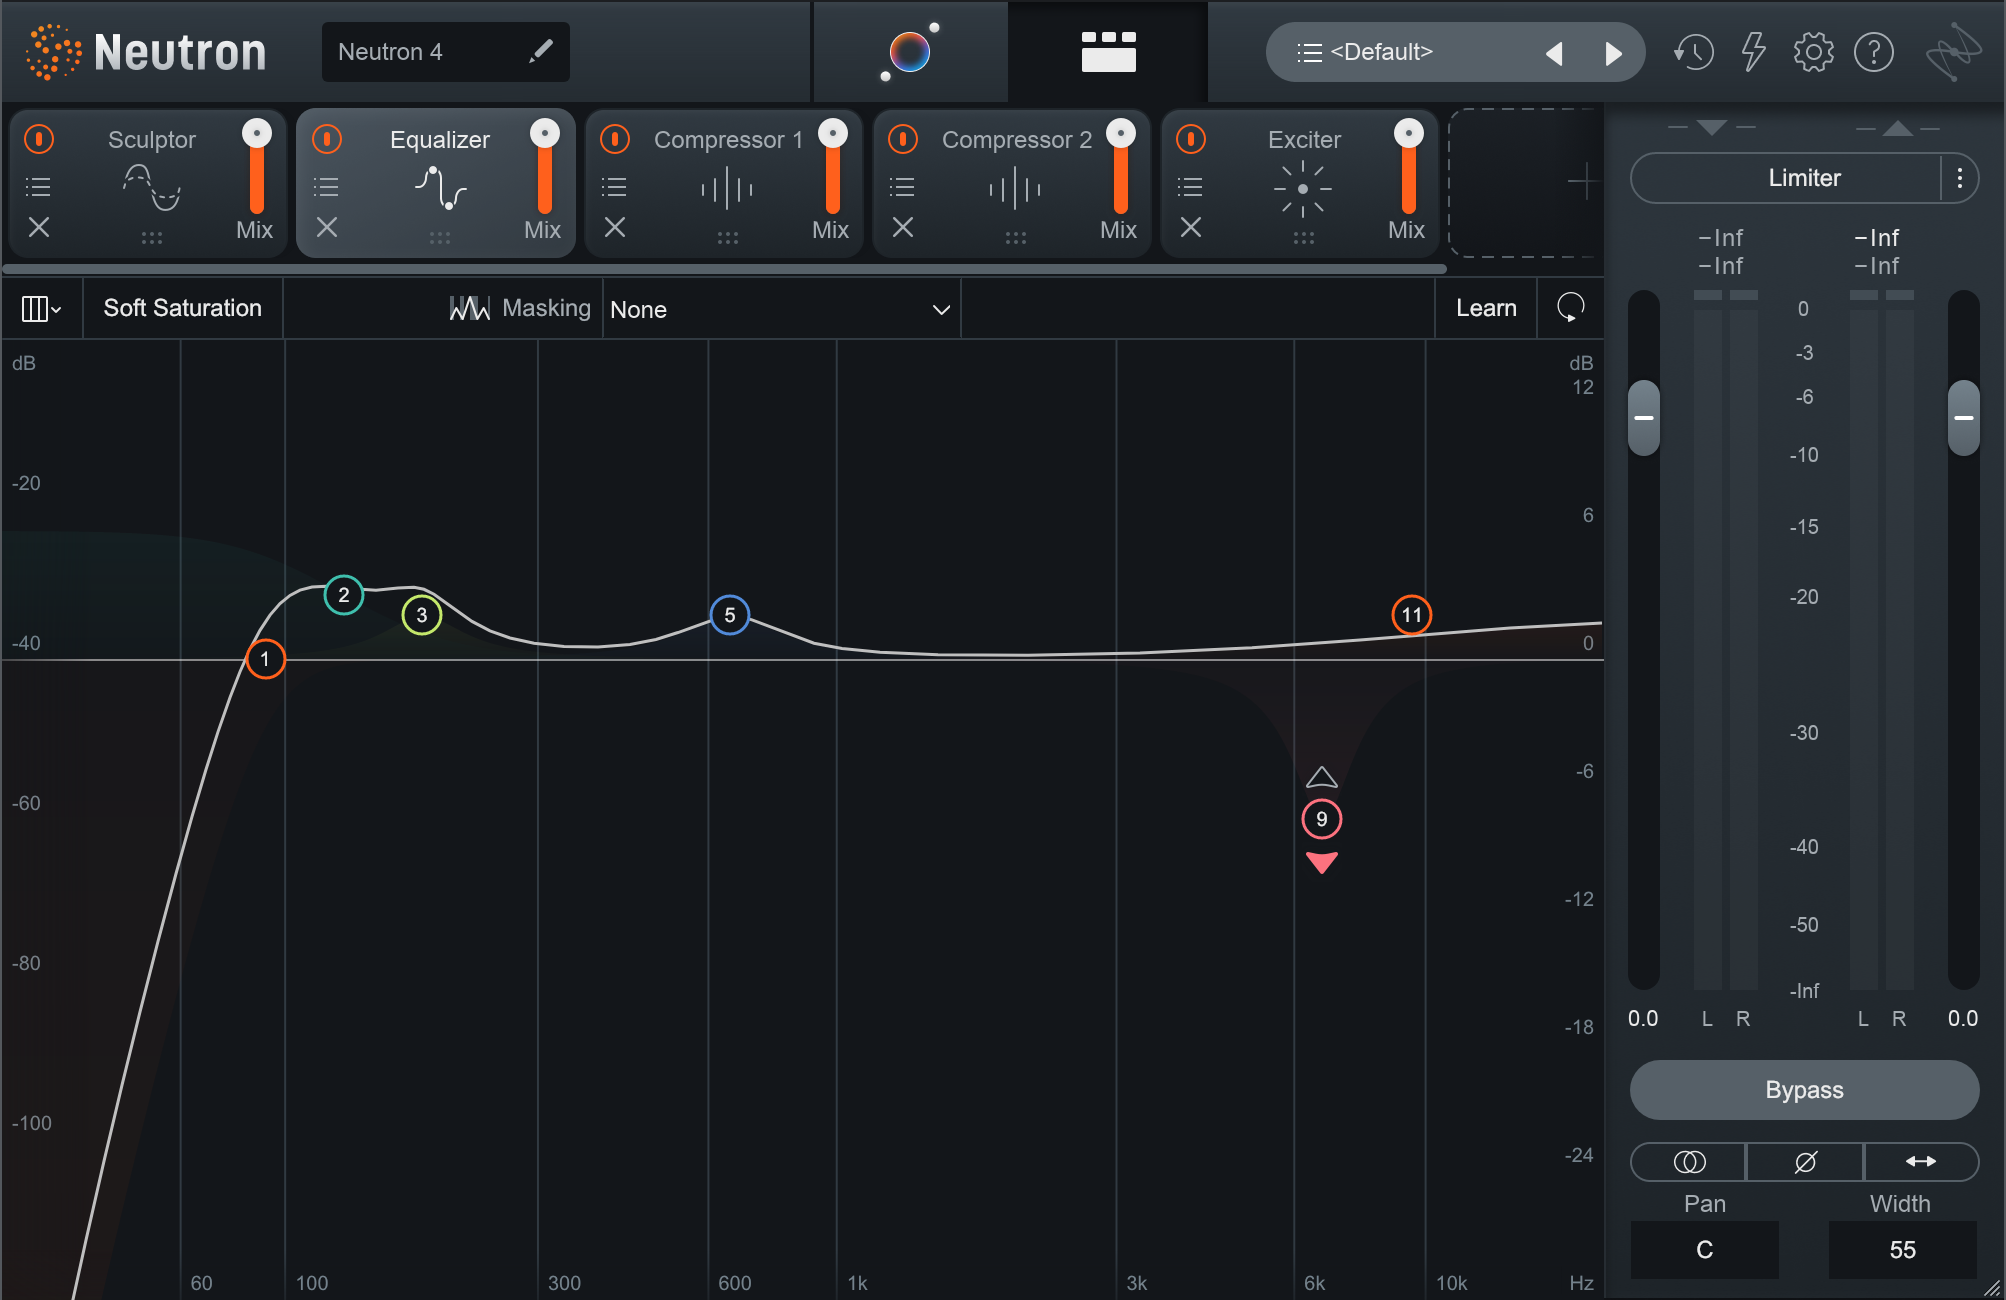
There are two compressors (one Vintage, one Punch) and an exciter at the end of the chain, again corresponding to the broad-stroke macros in the Assistant view. Heading up the start of the chain is the Sculptor, Neutron’s answer to making a track sound “more like itself”, and an EQ, which has rolled off the lows, created a couple of bumps for personality, and added a dynamic band at about 6kHz to reduce harshness.
At the start of the chain, in the Sculptor window, we can find our control for hitting the spectral target, as used above.
This is all a pretty great starting point. Even if you never touch the macros in Assistant View, you’ll have plenty more to play with in terms of bread and butter mixing effects.
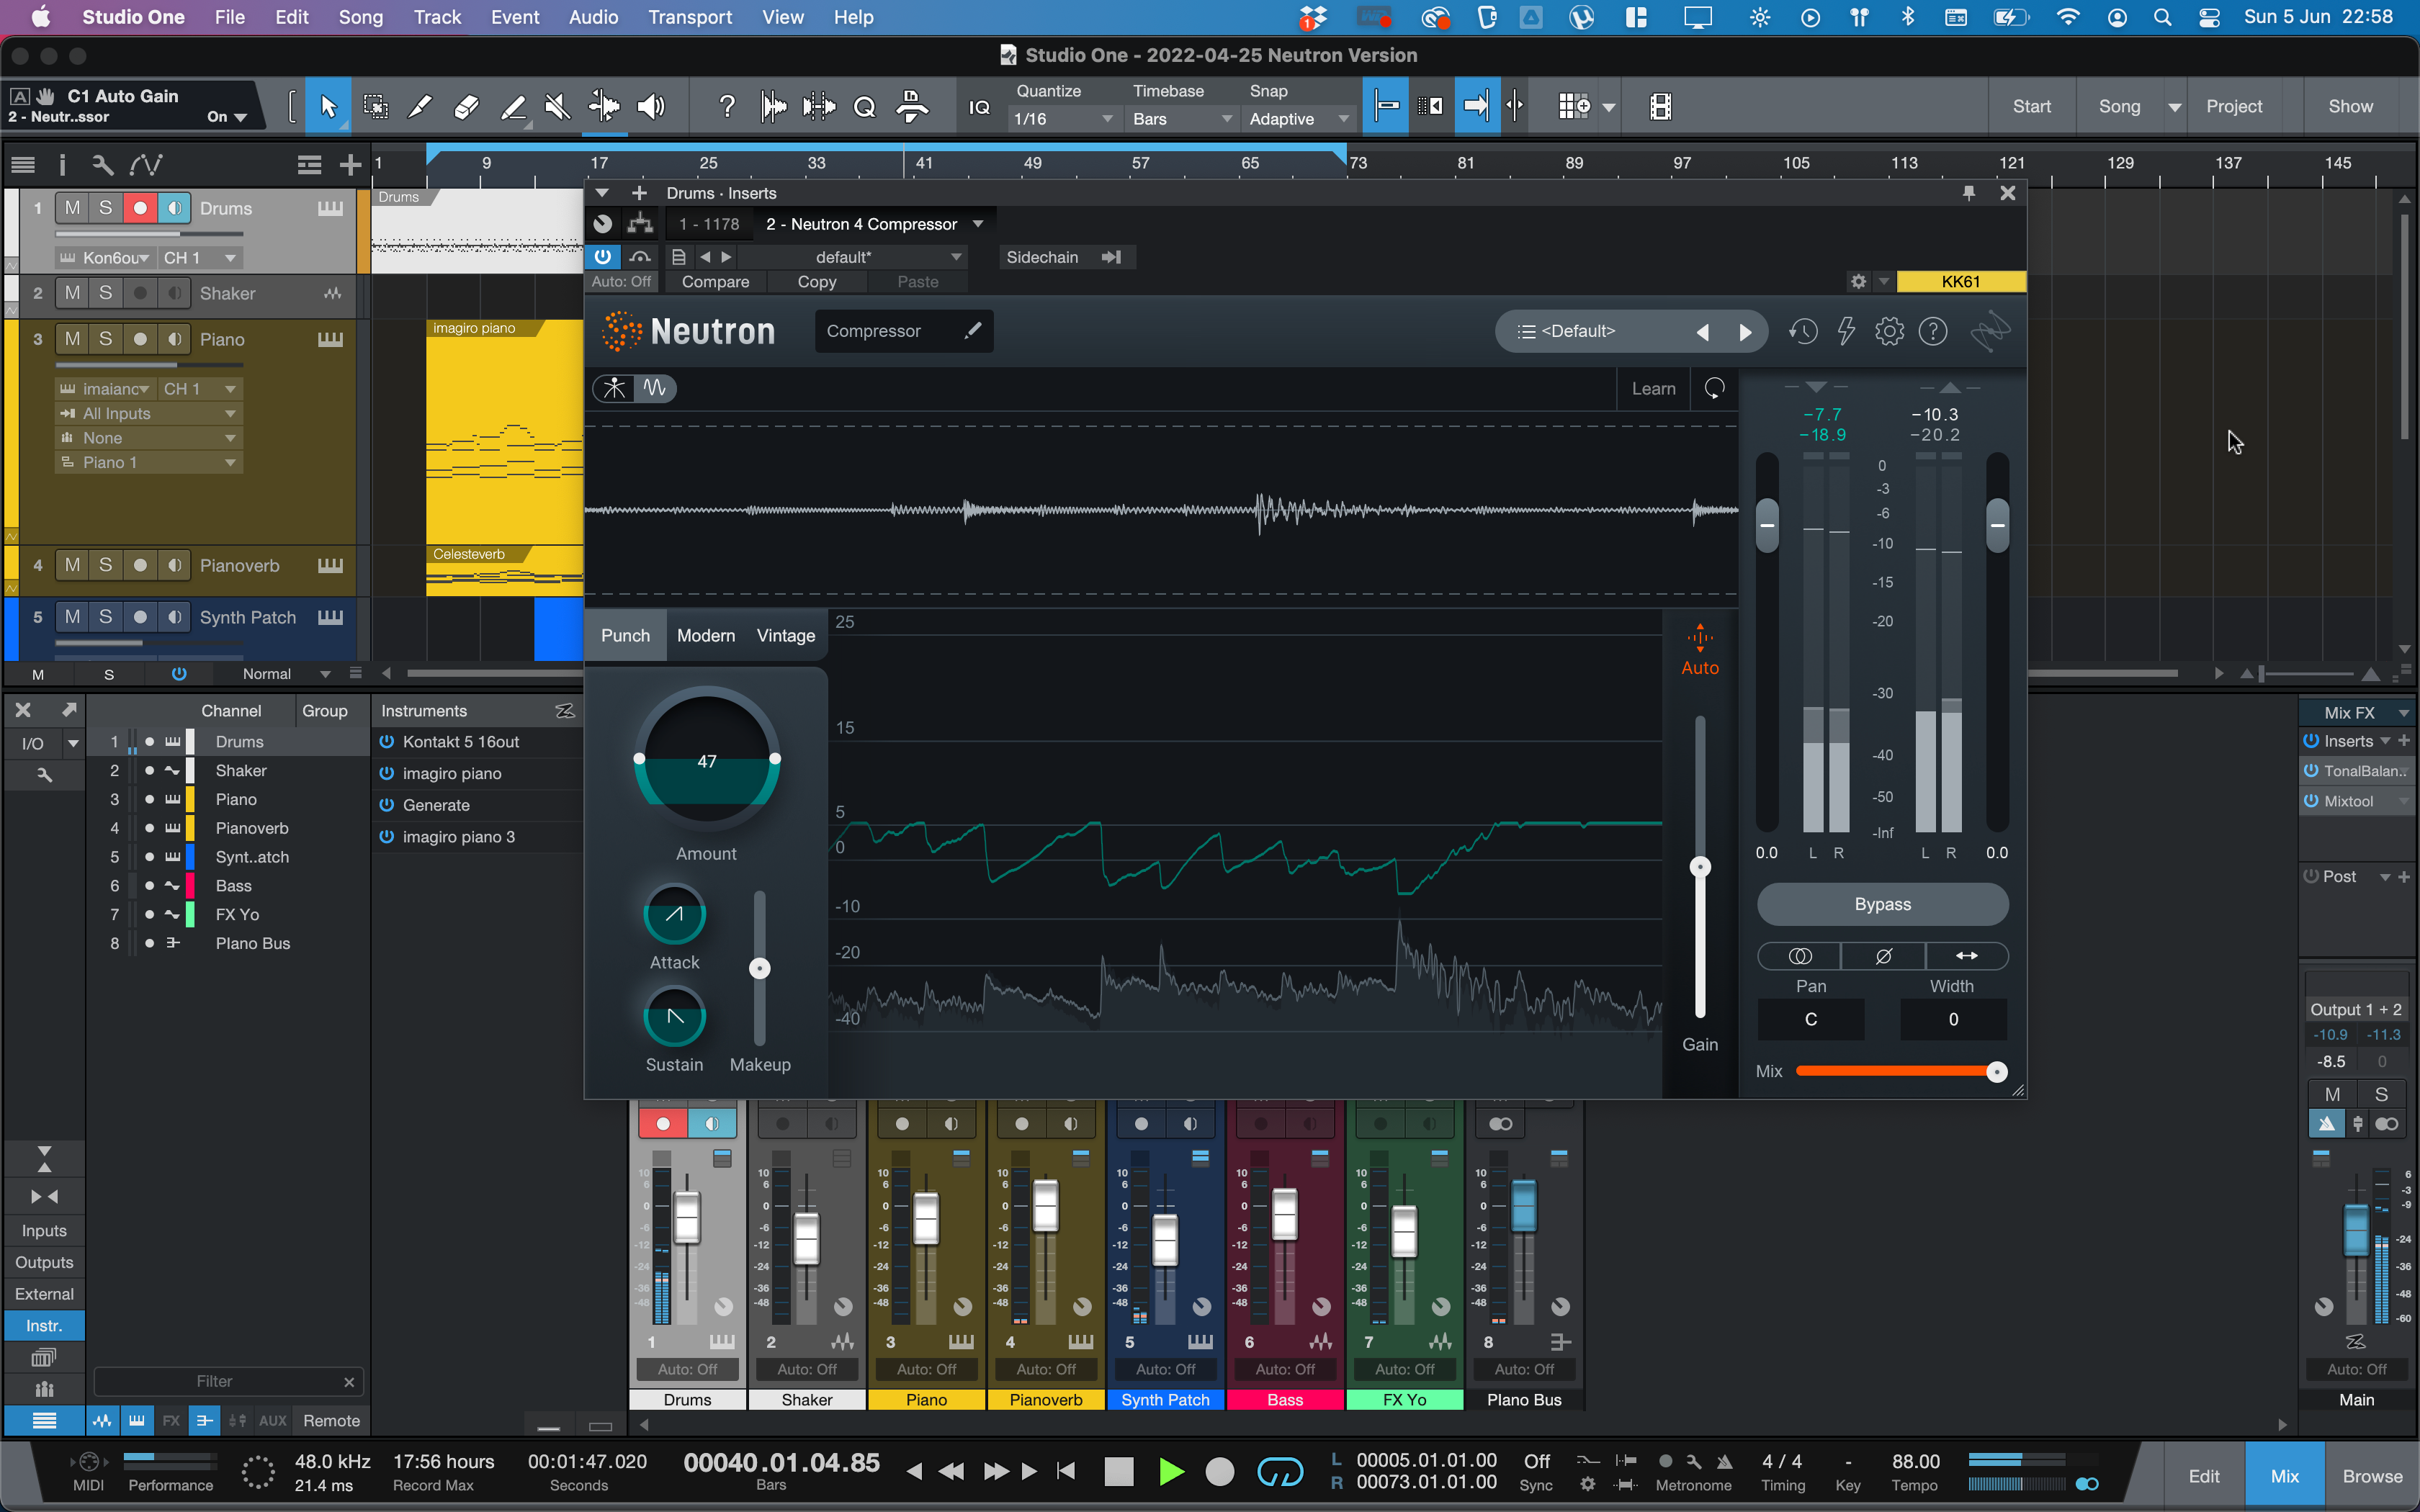
The New Punch Compressor
Neutron’s Compressor module already had two modes of operation: Modern and Vintage. Now, the new Punch mode adds a simpler way to compress, driven more by under-the-hood algorithms than by classic compression controls like Threshold, Ratio, Attack and Release.
We’ll load up the Compressor as a standalone plugin over our drums, and choose the Punch mode. The Amount control is bipolar; pushing it up above 100 emphasizes transients using expansion while bringing it down below 100 compresses the signal.

Attack and Release controls work similarly to a classic transient shaper, boosting either the attack portion of a sound or its body. Don’t get confused by the Makeup control – there’s also an Auto-Gain function on the output on the right-hand side of the module, and if its light is orange, it’s compensating for your processing’s level changes already.
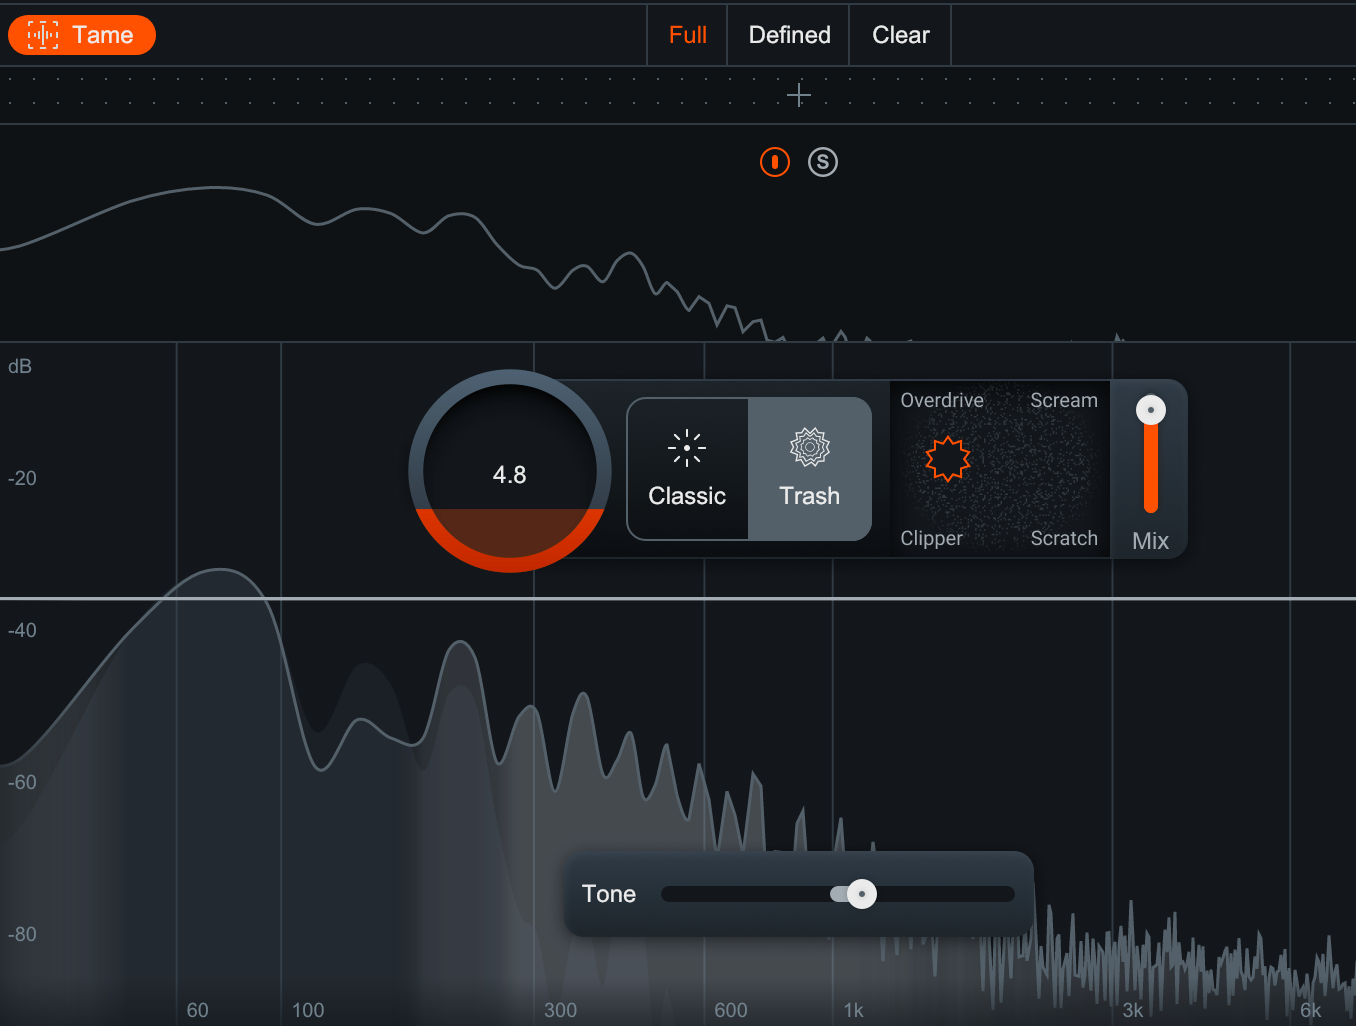
A Distortion that Smells like Trash
iZotope’s Trash 2 distortion plugin makes an appearance in Neutron 4’s Exciter, with its algorithms going into the new Trash mode (as opposed to ‘Classic’ mode).

Here, the four choices of distortion type have been overhauled, with a blend between Scream, Overdrive, Clipper and Scratch types. There’s a main Amount knob and a Mix control to bring things back to earth. And remember, this whole effect can be run as a multiband setup, too.
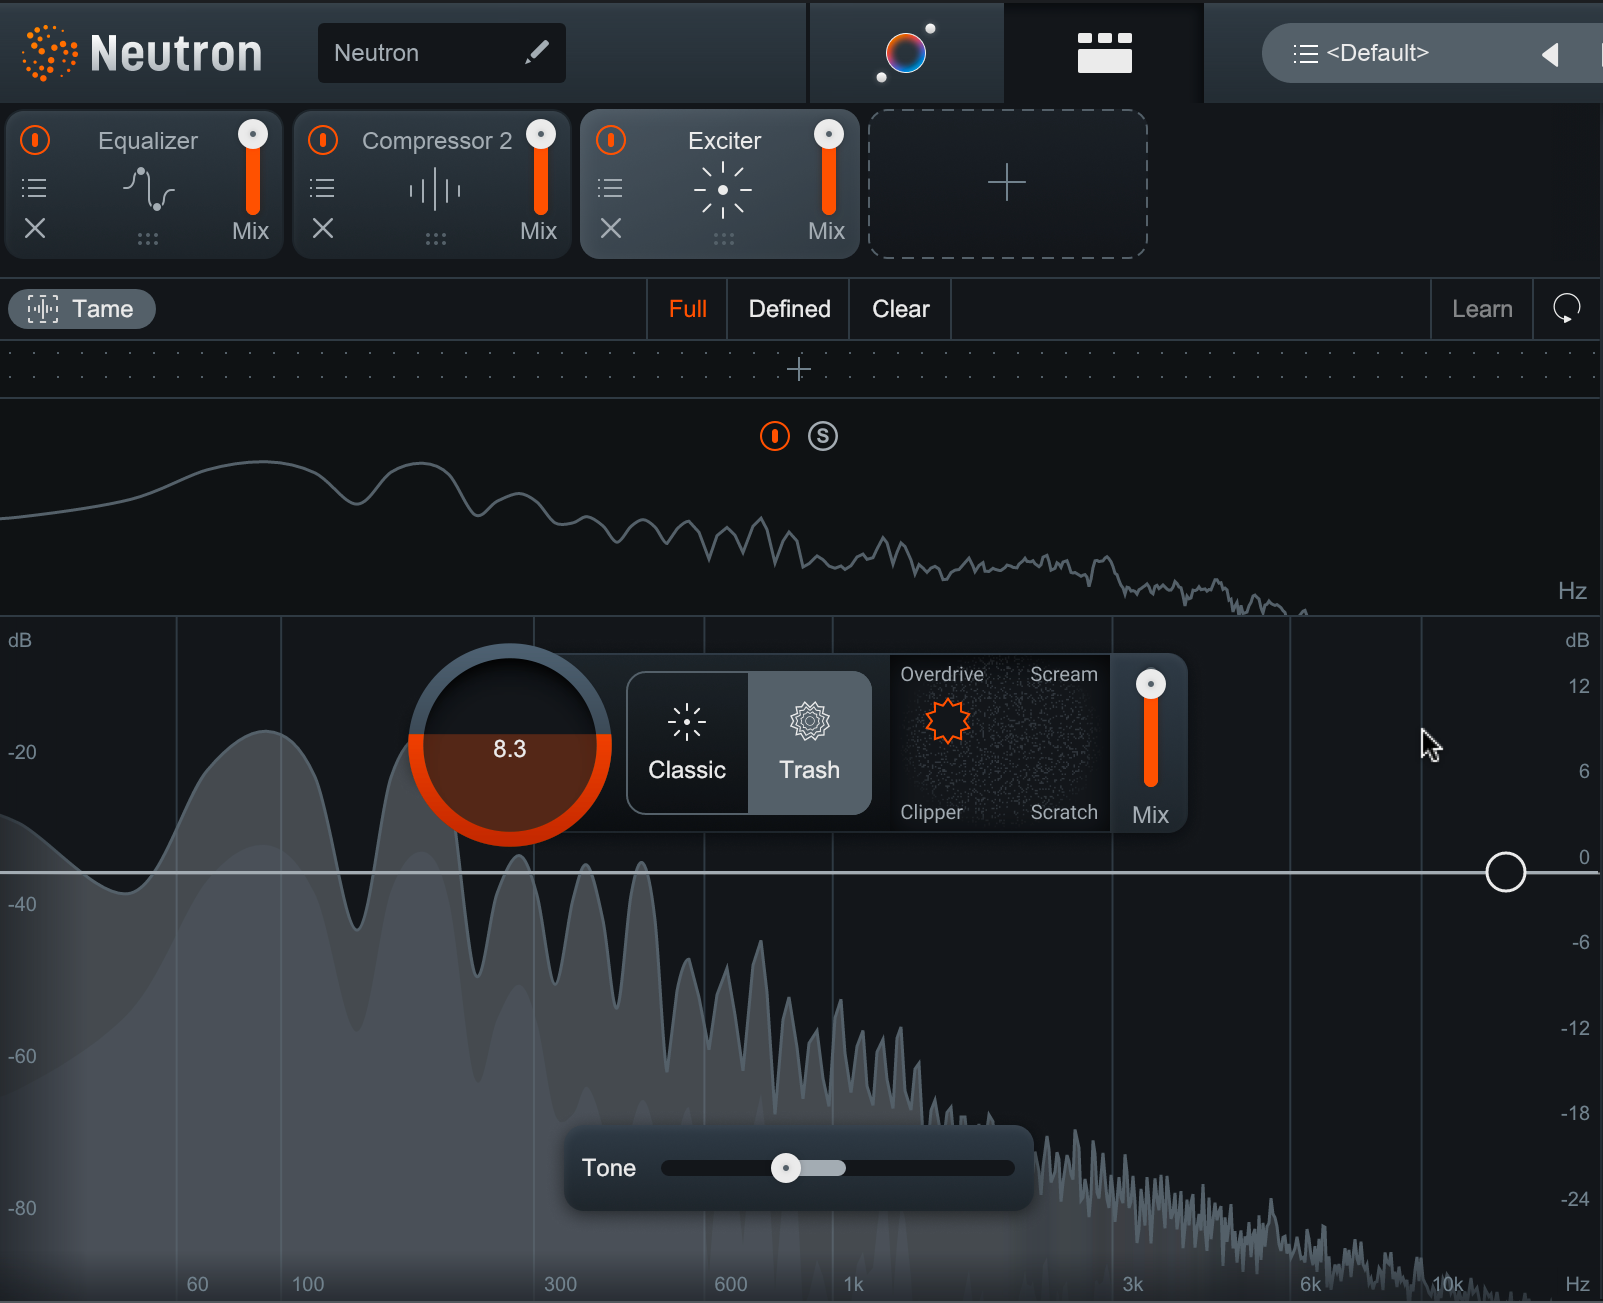
Tone and Tame
Elsewhere in the Exciter, there’s a new Tone control to weight the distortion to lower or higher frequencies. This helps you get extra-buzzy or deep and weighty with your effect, but it can risk making things too harsh or lost in a thick, distorted mud.
The Tame button helps to rectify this, bringing the lost dynamics kicking and screaming back into the distorted signal, and calming overzealous fuzz.
To try out the new features on the latest version of iZotope’s AI-assisted modular mixing software yourself, get the full version now. If you already have a previous Standard or Advanced version of Neutron you can follow an upgrade path here.

Other articles
Saffron’s Emerging Artist Development Programme Returns to Combat Music Tech Gender Gap
Backed by the PRS Foundation, the initiative offers a £1,000 grant, a 5-day studio retreat, and expert mentoring for Black women and gender-diverse creators in the South West of England. Bristol-based organisation Saffron has announced the return of their Emerging Artist Development Programme. Aimed at dismantling deep-rooted systemic barriers in music technology, the scheme is open to Black women and gender-diverse musical creators based in South West England. With reports showing that le
The Best Music Software Deals This Week [Live List]
As the music production landscape evolves week by week, so does the opportunity to save on powerful creative tools. New plugin releases, flash sales on VSTs and limited-time deals on music software can appear from any angle, making it harder than ever to keep track of what’s worth your attention. Whether you're looking for the latest bundles on offer, or even deals on exciting virtual instruments, it's as important as ever to stay up to date on what we have to offer. That’s where our live g
How Queer Ballroom Influenced House Music – A Collaborative Event
In a one-of-a-kind event in LA, we rejoiced in the name of house music and its queer origins by taking part in a community vogue ball (presented by Banjee Ball Foundation) after our Roland 909 product demo and giveaway, which followed our initial conference-style panel. It sure was an evening to be remembered with smiles and delight shared all around. Yet, we’re here to dissect the panel discussion, to dig into the real substance of what was discussed. We’ll be covering the main discussion po
Helping You Make It: Seven UK Organisations Creating Change Through Music
Make Music Day celebrates everyone who creates. Meet seven UK organisations helping people find the tools and communities they need to make music and be heard. Music is a universal connector. It’s always there, comforting us through our headphones or uniting a thousand of us on a dark club floor. It rushes in to fill the spaces between us and reminds us of why we are here. But before any of that, it needs to be made. That might mean opening a blank session, recording an idea before it disappe
